


43
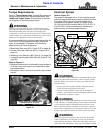
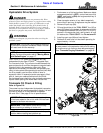
Section 5: Maintenance & Lubrication
ZT60i & ZT72i (S/N 748110+) Accu-Z
®
Zero Turn Mowers 357-552M
Table of Contents
2/06/14
Engine Oil & Oil Filter
Refer to Figure 5-12:
See “Engine Specifications & Capacities” on page 51
and “Engine Operator’s Manual” for oil type, capacity
and maintenance schedule. Check oil daily and after ever
4 hours of operation. Mower must be sitting level when
checking oil. Change engine oil and oil filter after the first
54 hours of operation and per engine manufacture’s
recommendations thereafter. Change oil more frequently
if mower is operated in extremely dirty conditions.
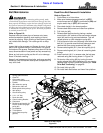
Check Engine Oil
Refer to Figure 5-12:
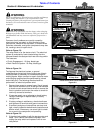
1. Park on a level surface, shut engine off and allow
time for oil to cool and drain into the sump.
2. Clean area around oil fill cap/dipstick (#1) of dirt and
debris before removing it. Unscrew oil fill cap and
wipe dipstick clean.
3. Check oil level on dipstick by insert dipstick fully in
without screwing it in and removing again to check
oil level.
4. If oil level on the dipstick is near or below lower limit
mark on dipstick, add recommended oil until it
reaches the full mark. Do not overfill.
5. Reinstall oil filler cap/dipstick by screwing it in firmly.
IMPORTANT: Make certain engine is level and you
are inserting the dipstick correctly when checking
oil. Incorrect oil levels can cause engine problems.
Change Engine Oil
Refer to Figure 5-12:
1. Park unit on a flat surface. Make sure blade
engagement switch is (OFF), both control levers are
(OUT) and park brake is (ON). Stop engine and
remove ignition key.
2. Place a suitable container on the ground beneath oil
drain valve (#3).
3. Unscrew oil drain valve (#3) until oil flows freely and
valve head offers some resistance. Do not unscrew
valve any farther.
4. Remove oil filter (#4) and let remaining oil drain out.
Make certain the existing O-ring is not stuck to filter
base (#2). Discard existing O-ring and filter in a
manner that is compatible with the environment.
5. Clean engine oil filter base (#2). Coat new oil filter
O-ring with clean engine oil and screw new oil filter
(#4) onto engine oil filter base.
6. Hand tighten new oil filter until O-ring seats against
oil filter base. Finish tightening by turning filter to the
specifications provided in the Engine Operator’s
Manual.
7. Retighten drain valve (#3).
8. Dispose of used motor oil in a manner that is
compatible with the environment. Do not throw used
oil in the trash, pour it on the ground, or down a drain.
9. Fill engine with the correct oil and quantity provided
in the Engine Operator’s Manual and specifications
on page 51 of this manual. Do not overfill with oil.
10. Replace oil fill cap/dipstick, start engine and check
oil filter for leaks.
11. Stop engine and check oil level. See “Check Engine
Oil” on this page.
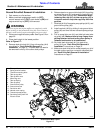
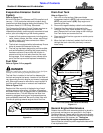
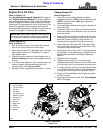
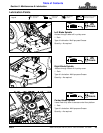
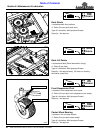
Engine Components
Figure 5-12
33816
1. Oil Fill Cap/Dipstick
2. Oil Filter Base
3. Oil Drain Valve
4. Oil Filter
5. Oil Cooler
6. Tail Pipe Clamp
7. Muffler Tail Pipe
8. Cooling Fan
9. Rain Cap
10. Air filter
11. Burp Valve
12. Muffler
13. Fuel Filter
14. Starter