


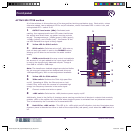

Operation
14 Square ONE Splitter
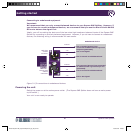
Operation
Basic operation
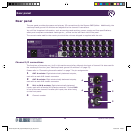
Caution:
Never apply phantom power to any unbalanced input source. Before powering the
unit, always check the +48V status of any phantom powered equipment connected
to any of the 16 output XLRs on the rear panel. If +48V is detected on any of these
outputs the unit will apply +48V to any devices connected to their corresponding
inputs (front or rear panel) as soon as the unit is powered up.
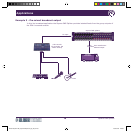
Connect all condenser mics and active DI boxes to the Square ONE Splitter before applying phantom power.
Ensure that the sound system level is turned down at this stage to prevent switch-on thumps or acoustic
feedback. The phantom power should be switched off for any channel being used with a dynamic mic or
passive DI box, although there shouldn’t be any problems if the phantom power is inadvertently left switched
on provided the sources are wired for balanced operation and connected using conventionally wired balanced
cables.
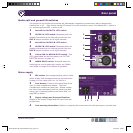
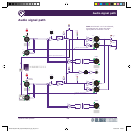
Use the solo facility to check the level of each input individually and set the gain to achieve the highest
possible signal level without clipping, that is, without the red LED of the OUTPUT meter illuminating. Leave
sufficient headroom to allow for unplanned increases in level during performance.
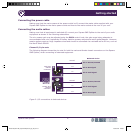
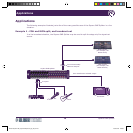
Both the transformer isolated and electronically balanced outputs offer exceptional audio quality combined
with excellent line driving capability. However, the transformer outputs may be preferred in situations where
absolute electrical isolation must be maintained, such as running feeds to mobile studios or outside broadcast
facilities. The fixed gain of the transformer outputs will also be preferable for broadcast trucks because they
can have totally independent control of their system gain, headroom etc.
In theory, the electronically balanced outputs remove any opportunity for the audio transformers to colour
the sound. However, in practice the sonic quality of the two types of output is very similar.
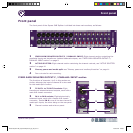
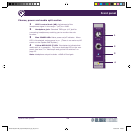
Solo bus operation
At the required channel, press the SOLO switch to switch solo on for that channel; its yellow LED (just above)
will illuminate to show that solo is switched on. Soloing a channel switches its signal onto the internal solo
bus, which allows it to be monitored in isolation via the headphone socket on the front of the unit. You can
solo more than one channel at a time.
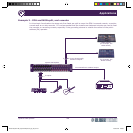
Using headphones
To hear any soloed channel(s) over the headphones, plug them into the PHONES socket at the right-hand
side of the front panel. The socket is a standard 1/4” TRS jack, which will accept any set of conventionally
wired stereo headphones. Adjust the volume using the LEVEL control knob.
DOC02-SQ1SPLITTER_Square ONE Splitter_Op_IssC.pdf 26 27/04/2010 17:00:43