


Maintenance
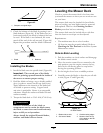
blade tip is 1/16-5/16 inch (1.6-7.9 mm) lower
than the rear blade tip (Figure 51 and Figure 52).
9. When the front-to-rear blade slope is correct
check the side-to-side level of the mower again;
refer to Leveling the Mower from Side-to-Side.
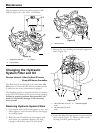
Removing the Mower
Service Interval: As required
1. Park the machine on a level surface and disengage
the blade control switch.
2. Move the motion control levers outward to the
park position, stop the engine, remove the key,
and wait for all moving parts to stop before
leaving the operating position.
3. Lower the height-of-cut lever to the lowest
position.
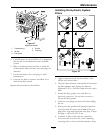
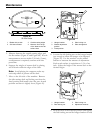
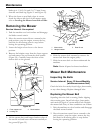
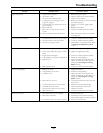
4. Remove the hairpin cotter from the front support
rod and remove the rod from the deck bracket
(
Figure 54). Carefully lower the front of the
mower deck to the ground.
G014635
1
2
3
Figure 54
1. Front support rod 3. Deck bracket
2. Locking nut
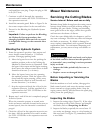
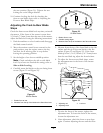
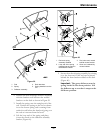
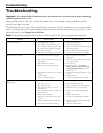
5. Lift the mower deck and hanger brackets clear of
the rear lift rod and lower the mower carefully to
the ground (Figure 55).
2
2
3
G005077
1
2
2
3
Figure 55
1. Mower deck
3. Rear lift rod
2. Hanger bracket
6. Slide the mower deck rearward to remove the
mower belt from the engine pulley.
7. Slide the mower deck out from underneath the
machine.
Note: Retain all parts for future installation.
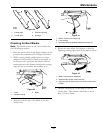
Mower Belt Maintenance
Inspecting the Belts
Service Interval: Every 25 hours/Monthly
(whichever comes rst)
Check the belts for cracks, frayed edges, burn marks,
or any other damage. Replace damaged belts.
Replacing the Mower Belt
Squealing when the belt is rotating, blades slipping
when cutting grass, frayed belt edges, burn marks,
and cracks are signs of a worn mower belt. Replace
the mower belt if any of these conditions are evident.
1. Park the machine on a level surface and disengage
the blade control switch.
2. Move the motion control levers outward to the
park position, stop the engine, remove the key,
and wait for all moving parts to stop before
leaving the operating position.
48