


Maintenance
and retain the hose. Wipe up any excess oil on
the frame (Figure 25).
Note: Dispose of the used oil at a recycling
center.
10. Apply a thin lm of clean Exmark 4-Cycle
Premium Engine Oil to the rubber gasket on the
new lter.
11. Install the replacement oil lter to the mounting
pad. Turn the oil lter clockwise until the rubber
gasket contacts the pad, then tighten the lter an
additional 1/2 to 3/4 turn.
12. Slowly pour approximately 80% of the specied
oil into the ller tube—use oil recommended in
the Checking the Oil Level section.
13. Install the oil ll cap/dipstick and push into place,
but Do Not screw it in.
14. Check the oil level (
Figure 24); refer to Checking
the Oil Level section.
15. Slowly add additional oil to bring it to the full
mark. Do Not overll.
16. Install the oil ll cap/dipstick.
17. Start the engine and check for leaks.
Servicing the Spark Plug
Service Interval: Every 200 hours/Every 2
years (whichever comes
rst)
Every 500 hours—Replace
the spark plug.
As stated in the maintenance intervals, remove the
spark plug, check condition, and reset the gap or
replace with a new plug as necessary.
The spark plug is RFI compliant. Equivalent alternate
brand plugs can also be used.
Type: NGK BPR4ES (or equivalent)
Air Gap: 0.030 inch (0.76 mm)
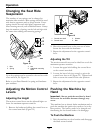
Removing the Spark Plug
1. Disengage the blade control switch, move the
motion controls outward to the park position,
stop the engine, and remove the key.
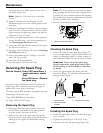
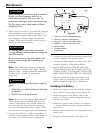
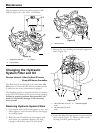
2. Pull the wire off of the spark plug (Figure 26).
Clean around the spark plug to prevent dirt from
falling into the engine and potentially causing
damage.
Note: Due to the deep recess around the spark
plug, blowing out the cavity with compressed air
is usually the most effective method for cleaning.
The spark plug is most accessible when the blower
housing is removed for cleaning.
3. Remove the spark plug and metal washer.
Figure 26
1. Spark plug and wire location
Checking the Spark Plug
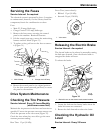
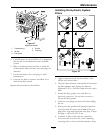
1. Look at the center of the spark plug (Figure 27).
If you see light brown or gray on the insulator, the
engine is operating properly. A black coating on
the insulator usually means the air cleaner is dirty.
Important: Never clean the spark plug.
Always replace the spark plug when it has a
black coating, worn electrodes, an oily lm,
or cracks.
2. Check the gap between the center and side
electrodes (
Figure 27). Bend the side electrode if
the gap is not correct.
Figure 27
1. Side electrode 3. Air gap (not to scale)
2. Center electrode
insulator
Installing the Spark Plug
1. Install the spark plug. Make sure that the air gap
is set correctly.
2. Tighten the spark plug to 16 ft-lb (22 N-m).
3. Push the wire onto the spark plug (
Figure 26).
34