


Maintenance
2. Make sure the engine is stopped, level, and is cool
so the oil has had time to drain into the sump.
3. To keep dirt, grass clippings, etc., out of
the engine, clean the area around the oil ll
cap/dipstick before removing it.
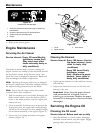
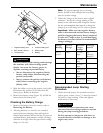
4. Remove the oil ll cap/dipstick; wipe oil off.
Reinsert the dipstick push into place, but Do Not
screw it in (
Figure 24).
Figure 24
1. Oil dipstick 3. Oil level
2. Filler tube
5. Remove the dipstick and check the oil level.
The oil level should be up to, but not over, the
“FULL” mark on the dipstick.
6. If the level is low, wipe off the area around the oil
ll cap, remove cap and add oil to the “FULL”
mark on the dipstick. Exmark 4-Cycle Premium
Engine Oil is recommended; refer to the Engine
Owner's manual for an acceptable alternative.
Always check the level with the dipstick before
adding more oil. Do Not overll.
Note: To prevent extensive engine wear or
damage, always maintain the proper oil level in the
crankcase. Never operate the engine with the oil
level below the “ADD” mark or over the “FULL”
mark on the dipstick.
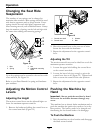
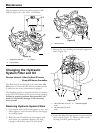
Changing the Oil and Filter
Service Interval: After the rst 5 hours
Every 100 hours/Yearly
(whichever comes rst)
thereafter.
Change the oil and lter while the engine is still
warm. The oil will ow more freely and carry away
more impurities. Make sure the engine is level when
lling, checking, or changing the oil.
1. Start the engine and let it run until warm. This
warms the oil so it drains better.
2. Disengage the blade control switch and move the
motion controls outward to the parking brake
position.
3. Stop the engine, remove the key, and wait for all
moving parts to stop before leaving the operating
position.
4. Clean the area around the oil drain valve and on
the machine frame.
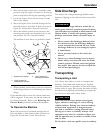
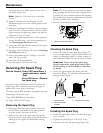
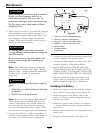
5. Install the oil drain hose, located in the literature
pack, onto the oil drain valve (
Figure 25). Remove
the oil ll cap/dipstick.
Figure 25
1. Oil lter 4. Oil drain hose
2. Oil ll cap/dipstick
5. Pan
3. Oil drain valve
6. Place a pan under the open end of the hose.
7. Open the drain valve by turning hex end
counterclockwise. Be sure to allow ample time
for complete drainage.
8. Remove the old lter and wipe off the mounting
pad.
9. When the oil has drained completely, close the oil
drain valve by rotating it clockwise and remove
33