


Maintenance
and install that vent plug. Torque the plug to 180
in-lb (20.3 N-m).
7. Continue to add oil through the expansion
reservoir until it reaches the FULL COLD line on
the expansion reservoir.
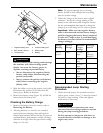
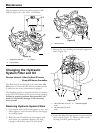
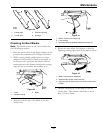
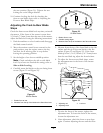
8. Install the transaxle guard. Refer to
Figure 36 for
the correct torque values for the nuts and bolts.
9. Proceed to the Bleeding the Hydraulic System
section.
Important: Failure to perform the
Bleeding
theHydraulicSystem
procedure after
changing hydraulic lters and oil can result
in irreparable damage to the transaxle drive
system.
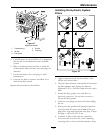
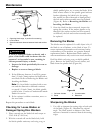
Bleeding the Hydraulic System
1. Enter the operator's position. Start engine and
move throttle control ahead to 1/2 throttle
position. Disengage parking brake.
A. Move the bypass levers into the pushing the
machine position; refer to the Pushing the
Machine by Hand section in Operation. With
the bypass valves open and the engine running,
slowly move the motion control levers in both
forward and reverse (5 or 6 times).
B. Move the bypass levers into the operating
the machine position. With the bypass valve
closed and the engine running, slowly move
the directional control in both forward and
reverse directions (5 to 6 times).
C. Stop the engine and check the oil level in the
expansion reservoir. Add the specied oil as
until it reaches the FULL COLD line on the
expansion reservoir.
2. Repeat step 1 until all the air is completely purged
from the system.
When the transaxle operates at normal noise
levels and moves smoothly forward and reverse at
normal speeds, then the transaxle is considered
purged.
3. Check the oil level in the expansion reservoir one
last time. Add the specied oil as until it reaches
the FULL COLD line on the expansion reservoir
if necessary.
Mower Maintenance
Servicing the Cutting Blades
Service Interval: Before each use or daily
Maintain sharp blades throughout the cutting season
because sharp blades cut cleanly without tearing or
shredding the grass blades. Tearing and shredding
turns grass brown at the edges, which slows growth
and increases the chance of disease.
Check the cutter blades daily for sharpness, and for
any wear or damage. File down any nicks and sharpen
the blades as necessary. If a blade is damaged or
worn, replace it immediately with a genuine Exmark
replacement blade. For convenient sharpening and
replacement, you may want to keep extra blades on
hand.
WARNING
A worn or damaged blade can break, and a piece
of the blade could be thrown into the operator's
or bystander's area, resulting in serious personal
injury or death.
• Inspect the blade periodically for wear or
damage.
• Replace a worn or damaged blade.
Before Inspecting or Servicing the
Blades
Park the machine on a level surface, disengage the
blade control switch, and move the motion control
levers outward to engage parking brake. Stop the
engine, remove the key, and disconnect the spark plug
wire(s) from the spark plug(s).
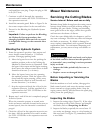
Inspecting the Blades
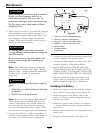
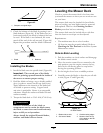
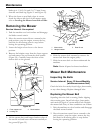
1. Inspect the cutting edges (Figure 39). If the edges
are not sharp or have nicks, remove and sharpen
the blades; refer to Sharpening the Blades.
2. Inspect the blades, especially the curved area. If
you notice any damage, wear, or a slot forming in
this area (item 3 in
Figure 39), immediately install
a new blade.
42