


Instruction Manual Clarity II T56
PN-51-T56 May 2012
Maintenance 29
8.3 Debubbler and Measuring Chamber
8.3.1 Cleaning the sensor
1. Turn off the sample supply to the debubbler.
2. Remove the sensor and put it in a safe place. The calibration cup is a good place to store
the sensor.
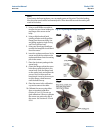
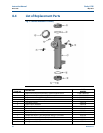
3. Loosen the small drain plug in the base plug and allow the sample in the debubbler to drain
out. See Figure 8-4. Replace the drain plug.
4. Unscrew the upper and lower caps. Be careful not to lose the O-rings.
5. Use a stream of water, a brush, or a rag to flush and clean out the inside of the debubbler
and measuring chamber.
6. Inspect the O-rings for signs of damage and replace if necessary. The part number for the
O-ring (one each) is 9550316.
7. Replace the upper and lower caps.
8. Replace the sensor.
8.3.2 Cleaning the orifice
1. Turn off the sample to the debubbler.
2. Disconnect the drain line. Unscrew the drain fitting from the orifice; then unscrew the
orifice from the debubbler body. See Figure 8-4.
3. Use a stream of water to flush out any residue accumulated in the orifice. Direct the stream
of water counter to the normal flow through the orifice.
4. If the material plugging the orifice cannot be removed with flushing, use a toothpick or a
stiff wire to push out the obstruction. Push counter to the normal flow through the orifice.
5. Reinstall the orifice and reconnect the drain line. Turn on the sample flow.
6. If the blockage cannot be removed or the orifice is damaged during cleaning, replace the
orifice (PN 33947-00).
BEFORE DISCONNECTING THE SAMPLE AND DRAIN LINES OR REMOVING THE
SENSOR, be absolutely certain the process pressure is reduced to 0 psig and
the process temperature is at a safe level.
WARNING