


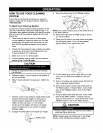


NOTE: There may be small tube adapters included
with the hose reel kit that are not used on this model.
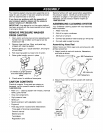
IMPORTANT: You must take the hose off the reel
when operating your cleaning system. The reel is for
storage purposes only.
Add Engine Oil
IMPORTANT: Any attempt to crank or start the engine
before it has been properly serviced with the
recommended oil may result in an engine failure.
NOTE: When adding oil to the engine crankcase, use
only high quality detergent oil rated with API service
classification SF, SG, SH, SJ or higher rated SAE 30
weight. DO NOT use special additives.
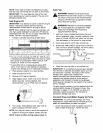
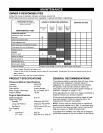
1. Choose a viscosity according to table below.
--E
STARTING TEMPERATURE RANGE ANTICIPATED BEFORE NEXT OIL CHANGE
* The use of multi-viscosity oils (5W-30, 10W-30, etc.)
in temperatures above 40°F (4°C) will result in higher
than normal oil consumption. When using a multi-
viscosity oil, check oil more frequently.
If using SAE 30 oil in temperatures below 40°F
(4°C), it will result in hard starting and possible
engine bore damage due to inadequate lubrication.
2. Place pressure washer on a level surface.
3. Clean area around oil fill.
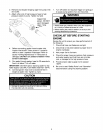
4. Remove oil fill cap and dipstick.
5. Wipe dipstick clean, insert it into oil fill hole and
tighten securely, remove dipstick. Add
recommended oil up to "Full" mark on dipstick.
©
6. Pour slowly. Wipe dipstick clean each time oil
level is checked. DO NOT overfill.
NOTE: You may not need to use all the supplied oil.
7. Install oil fill plug and dipstick, tighten securely.
NOTE: Check oil often during engine break-in.
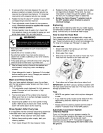
Add Fuel
_k ARNINGt NEVER fill fuel tank indoors.
NEVER fill fuel tank when engine is running or
hot. Allow unit to cool for two minutes before
refueling. DO NOT light a cigarette or smoke
when filling the fuel tank.
_k ARNING1 NEVER fill fuel tank completely
full. Provide space for fuel expansion. Wipe
away any fuel spillage from engine and
equipment before starting.
1. Use fresh, clean unleaded automotive fuel and
store in approved, clean, covered containers. Use
clean fill funnels. NEVER use "stale" fuel left over
from last season or fuel stored for long periods.
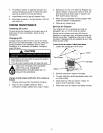
2. Clean area around fuel fill cap, remove cap.
3. Slowly add "UNLEADED" regular fuel to fuel tank.
Use a funnel to prevent spillage. Fill tank to about
1.5" below the bottom of the filler neck.
#NN_N_NNNN_N_f
4. Install fuel cap and wipe up any spilled fuel.
IMPORTANT: It is important to prevent gum deposits
from forming in essential fuel system parts, such as
the carburetor, fuel filter, fuel hose or tank during
storage. Also, experience indicates that
alcehol-blended fuels (called gasohol, ethanol or
methanol) can attract moisture, which leads to
separation and formation of acids during storage.
Acidic gas can damage the fuel system of an engine
while in storage.
To avoid engine problems, the fuel system should be
emptied before storage of 30 days or longer. See
"Storage" on pages 17-18. NEVER use engine or
carburetor cleaner products in the fuel tank or
permanent damage may occur.
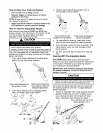
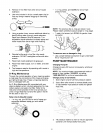
Connect Hose and Water Supply to Pump
IMPORTANT: To avoid pump damage, you must
assemble the nozzle extension to the spray gun and
attach all hoses before you start the engine.
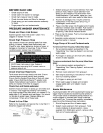
1. Uncoil high pressure hose and attach one end of
hose to base of spray gun. Tighten by hand.