


36 37
36 37
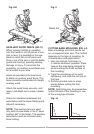
CUTTING CROWN MOULDING
(FIG. KK, LL)
Crown moulding must be compound
mitered with extreme accuracy. The
two surfaces on the crown moulding
must fit the wall or ceiling, and each
other.
The two cut surfaces of the miterd
moulding must add to a 90° angle.
Most crown moulding has a top angle
of 52° that fits flat on the ceiling, and
a bottom rear angle of 38° that fits flat
against the wall.
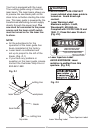
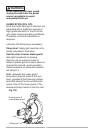
1. If the crown moulding is thin and
cannot stand vertically on edge, lay
the moulding flat with its widest back
surface flat on the saw table.
(Fig. KK)
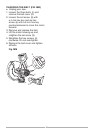
2. To avoid splintering and marking,
tape the cutting line and any surface
that is being clamped.
3. The angle settings for the two
pieces of moulding that will be
adjoining in any one corner, will be
interdependent with each other. Any
change in the setting for one side
must be equally compensated for on
the other side.
4. All settings should be tested on
scrap material before cutting the
actual moulding.
Fig. KK
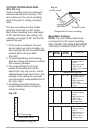
Fig. LL
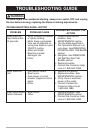
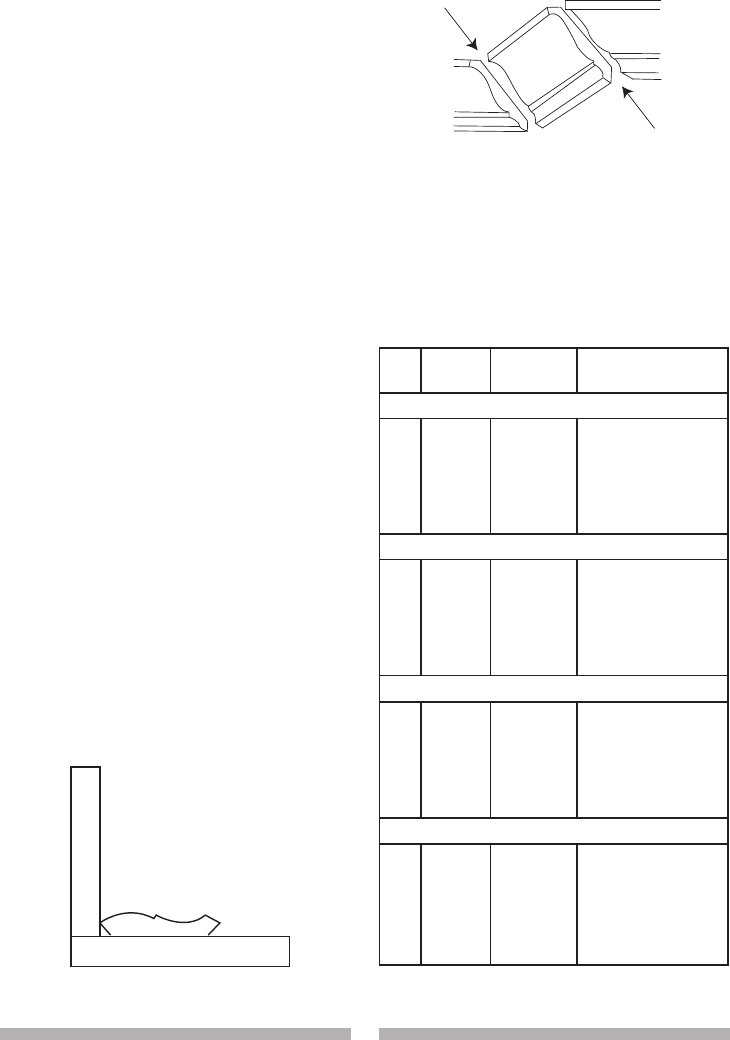
Bevel/Miter Settings
NOTE: The chart below references
a compound cut for crown moulding
ONLY WHEN THE ANGLE BETWEEN
THE WALLS EQUALS EXACTLY 90°.
F
e
n
c
e
Mitre saw table
F
e
n
c
e
Mitre saw table
IL
IR
OL
OR
Compound cut crown moulding
Inside corner
Outside corner
Miter saw table
F
e
n
c
e
Workpiece lying flat
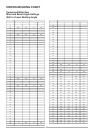
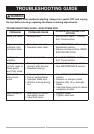
KEY
BEVEL
SETTING
MITER
SETTING
TYPE OF CUT
Inside corner-Left side
IL 33.9° 31.6° Right 1. Position top of
molding against
fence.
2. Miter table set at
RIGHT 31.6°.
3. LEFT side is finished
piece.
Inside corner-Right side
IR 33.9° 31.6° Left 1. Position bottom of
molding against
fence.
2. Miter table set at
LEFT 31.6°.
3. LEFT side is finished
piece.
Outside corner-Left side
OL 33.9° 31.6° Left 1. Position bottom of
molding against
fence.
2. Miter table set at
LEFT 31.6°.
3. RIGHT side is
finished piece.
Outside corner-Right side
OR 33.9° 31.6° Right 1. Position top of
molding against
fence.
2. Miter table set at
RIGHT 31.6°.
3. RIGHT side is
finished piece.