


Installation
14 975-0126-02-01
3. Save your purchase receipt to use as proof-of-purchase, especially for
warranty service. This is required if the inverter/charger should need warranty
service.
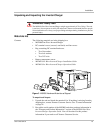
4. Save the original shipping carton and packing materials. If the inverter/
charger needs to be returned for service, it should be shipped in the original
carton. This is also a good way to protect the inverter/charger if it ever needs
to be moved.
Installation Tools and Materials
Tools You will need the following tools to install the MS2000 and the battery
temperature sensor.
❐ Wire stripper
❐ Crimping tools for fastening lugs and terminals on DC cables
❐ Phillips screwdriver: #2
❐ Slot screwdriver (1/4" wide blade max.) for AC terminals
❐ Slot screwdriver (1/8" wide blade max.) for Echo Charger connector
❐ Needle-nose pliers
❐ Wrench for DC terminals: 7/16"
❐ Wrench for DC grounding connection: 5/16"
Materials You will need the following materials to complete your installation:
❐ Strain-relief clamp(s) for AC cables: 3/4" and/or 1"
❐ DC battery cables sized according to Table 2 on page 12
❐ Terminals and/or crimp connectors for DC cables (for 3/8" stud size)
❐ Copper wire for DC grounding sized according to Table 2 on page 12
❐ Terminal or crimp connector for DC grounding cable (for 1/4" stud size)
❐ AC and DC disconnect switches and over-current protective devices and
connectors as required
❐ Cables for AC input and output wiring
❐ Six ¼"–20 1.25" length steel screws or bolts to mount the MS2000
For a list of tools and materials required to install the network, refer to the Xanbus
System Installation Guide, which is available for download at www.xantrex.com.