


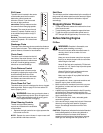

6
IMPORTANT: This unit is shipped with engine oil in the
engine, but without gasoline. After assembly, see
OPERATION section of this manual for fuel selection
and fill-up.
Removing From Carton
• Cut the corners of the carton and lay the sides flat
on the ground. Remove all packing inserts.
• Remove all loose parts. For a complete list of the
loose parts, refer to the following section.
• Move the snow thrower out of the carton.
• Make certain all parts and literature have been
removed before discarding the carton.
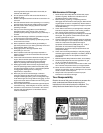
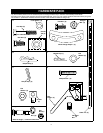
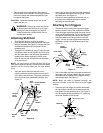
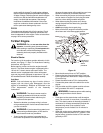
Loose Parts
Your snow thrower has been assembled at the factory
except the parts shipped loose in the carton. These are
listed below.
(See Figure 1 .)
a. Handle and Handle Panel Assembly
b. Chute Assembly
c. Electric Start Cord
d. Two-piece Chute Crank Assembly
e. Shift Rod
f. Hardware Pack
Tools Required
1. 1/2" , 7/16”, 3/8” wrenches or a set of adjustable
wrenches
2. Set of pliers
3. Set of philips head screw drivers
4. Funnel to fill up gasoline
Before Assembly
• Disconnect spark plug wire and ground it against
the engine to prevent unintended starting.
NOTE: All references in this manual to the left or right
side of the snow thrower is from the operating position
only. Exceptions, if any, will be specified.
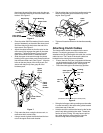
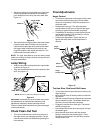
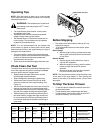
Attaching Handle Assembly
• Stretch out the control cables and place the
handles and handle panel assembly on the floor.
See Figure 2.
• Position the two ends of the handles on the snow
thrower frame as indicated by arrows in Figure 2.
For your convenience, you may place the
discharge chute on the chute opening. Align the
two lower holes on each handle to the
corresponding holes on the snow thrower frame.
ASSEMBLY
Rear
Front
Right
Left
Figure 1
Electric
Start Cord
Shift
Rod
Chute
Crank
Discharge Chute
Handle & Handle
Panel Assembly