


15
• Disconnect the power cord from the receptacle first
and then from the switch box on the engine.
• Allow the engine to warm up for a few minutes
because the engine will not develop full power until
it reaches operating temperature. Operate the
engine at full throttle (FAST) when throwing snow.
Warm Start
• If restarting a warm engine, rotate choke to OFF
instead of FULL and press the starter button.
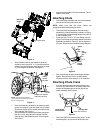
Recoil Starter
Make sure that the engine has sufficient oil and the
auger drive and the traction drive levers are released.
• Move throttle control to FAST position.
• Push key into the ignition slot so that it snaps into
place. Do not turn key.
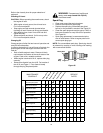
• Rotate choke control to FULL choke position.
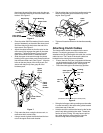
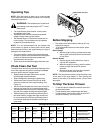
• Push the primer button while covering the vent hole.
Remove your finger from the primer between primes.
Do not prime if temperature is above 50
o
F; prime
two times between 50
o
F and 15
o
F; and prime four
times below 15
o
F.
• Pull the starter handle rapidly. Do not allow the
handle to snap back, but allow it to rewind slowly
while keeping a firm hold on the starter handle.
• As the engine warms up and begins to operate
evenly, rotate the choke knob slowly to OFF
position. If the engine falters, return to FULL choke,
then slowly move to OFF choke position.
• Allow the engine to warm up for a few minutes
because the engine will not develop full power until
it reaches operating temperature.
• Operate the engine at full throttle (FAST) when
throwing snow.
Warm Start
• If restarting a warm engine after a temporary shut
down, rotate choke to OFF instead of FULL and do
not prime. Press the starter button.
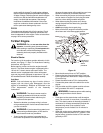
Frozen Recoil Starter
If the starter is frozen and will not turn the engine, pro-
ceed as follows:
• Pull as much rope out of the starter as possible.
• Release the starter handle and let it snap back
against the starter.
• If the engine still fails to start, repeat the first two
steps. If continued attempts do not free starter,
follow the electric starter procedures to start.
• Avoid possible freezing of recoil starter and the
engine controls.
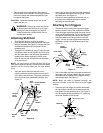
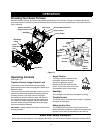
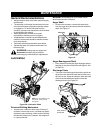
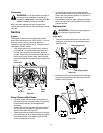
To Engage Drive
• With the engine running near top speed, move shift
lever to one of six FORWARD positions or two
REVERSE positions. Select a speed appropriate
for the snow conditions that exist. Use slower
speeds until you are familiar with the operation of
the snow thrower.
• Squeeze the traction drive clutch grip against the
right handle and the snow thrower will move.
Release it and the drive motion will stop.
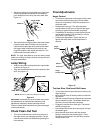
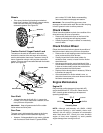
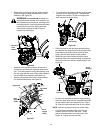
To Engage Augers
• To engage the augers and start snow throwing,
squeeze the left hand auger clutch grip against the
left handle. Release to stop augers.
• While the auger control is engaged, squeeze the
traction drive control to move, release to stop. Do
not shift speeds while the drive is engaged.
NOTE: This same lever also locks the auger control so
you can turn the chute crank without interrupting the
snow throwing process.
• Release the auger control; the interlock mechanism
should keep the auger control engaged until the
traction drive control is released.
• Release the traction drive control to stop both the
augers and the wheel drive.
To Throw Snow
CAUTION: Check the area to be cleared for foreign
objects. Remove, if any.
• Start the engine following starting instructions.
• Rotate the discharge chute to the desired direction,
away from bystanders and/or buildings. Move the
chute distance control forward or backward to
adjust the distance the snow is to be thrown.
• Select the speed according to snow condition.
CAUTION: Never move the shift lever without first
releasing the drive clutch.
• Engage the auger control and traction drive control
levers following instructions above.
• The interlock feature will allow you to remove your
left hand from the auger control lever.
• When clearing the first pass through the snow,
control the traction speed of the snow thrower
according to the depth and condition of snow.
• To turn the unit left, squeeze left trigger; to turn
right, squeeze right trigger.
• On each succeeding pass, readjust the chute
deflector to the desired position and slightly overlap
the previously cleared path.
• After the area is cleared, stop the snow thrower
following instructions given below.
WARNING: To stop the auger, both levers
must be released