


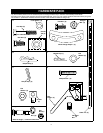

13
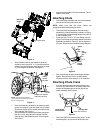
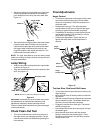
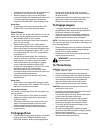
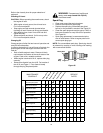
Shift Lever
The shift lever is located in the center
of the handle panel and is used to
determine ground speed and
direction of travel. It can be moved
into any of eight positions.
IMPORTANT:
Always release traction
the control before changing speeds.
Forward: The snow thrower has six
forward (F) speeds. Position one (1)
is the slowest and position six (6) is
the fastest.
Reverse: The snow thrower has two
reverse (R) speeds—R1 is the slower
of the two.
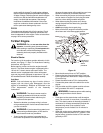
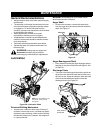
Discharge Chute
The angle of the discharge chute controls the distance
that the snow is thrown. Tilt the discharge chute up for
greater distance; tilt down for less distance.
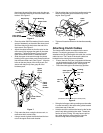
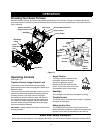
Chute Crank
The chute crank is located on the left
hand side of the snow thrower. Use it
to change the direction in which snow
is thrown. Avoid targetting persons,
animals or cars and buildings.
Chute Distance Control
The distance snow is thrown can be
changed by adjusting the angle of the
chute assembly. Move the chute
distance control forward to decrease
the distance and toward the rear to
increase the distance.
Chute Clean-Out Tool
The chute clean-out tool is designed to clear a clogged
discharge chute. Refer to page 16 for instructions on
how to properly use it.
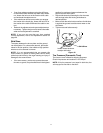
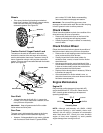
Wheel Steering Controls
The left and right wheel steering
controls are located on the underside
of the handles.
• Squeeze the right control to turn right; squeeze the
left control to turn left.
NOTE: Operate the snow thrower in open areas until
you are familiar with these controls.
Skid Shoe
The skid shoe position is determined by the condition of
the ground from where snow has to be removed. Higher
the snow level, lower will be the skid shoe. Adjust it
accordingly.
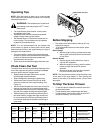
Stopping Snow Thrower
• To stop the wheels, release the traction drive lever
of the snow thrower.
• To stop throwing snow, release the auger drive lever.
• To stop the engine, push throttle control lever to
OFF and pull out the ignition key. Do not turn key.
Before Starting Engine
Fill Gas
• Store gasoline in a clean, approved container and
keep the cap in place on the container.
• Make sure that the container from which you pour
the gasoline is clean and free from rust or other
foreign particles.
• A plastic cap is provided inside the fuel fill opening
on the fuel tank. Remove and discard this cap
before filling up the tank. Use the separate fuel tank
cap to close after fill-up.
• Fill fuel tank with clean, fresh, unleaded grade
automotive gasoline.
• At the end of the job, empty the fuel tank if the snow
thrower is not going to be used for 30 days or
longer. See storage instructions on 25 of this
manual.
CAUTION: Experience indicates that alcohol blended
fuels (called gasohol) or those using ethanol or
methanol can attract moisture which leads to
separation and formation of acids during storage.
Acidic gas can damage the fuel system of an
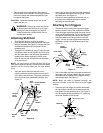
WARNING: Never use your hand to clear a
clogged discharge chute. Shut off engine and
remain behind handles until all moving parts
have stopped before unclogging.
6
1
2
F
3
4
5
R2
R1
R
CLOCKWISE TO
DISCHARGE LEFT
COUNTER CLOCKWISE
TO DISCHARGE RIGH
T
WARNING: Gasoline is flammable; use
caution when handling or storing it.
Do not fill fuel tank while the snow thrower is
running, when it is hot or when it is in an
enclosed area.
Keep your snow thrower away from any open
flame or an electrical spark and do not smoke
while filling the fuel tank.
Never fill the fuel tank completely. Fill the tank
to within 1/4"-1/2" from the top to provide space
for expansion of fuel.
Always fill the fuel tank outdoors and use a
funnel or spout to prevent spilling.
Make sure to wipe off any spilled fuel before
starting the engine.