


September 25, 2012
7075-166
Page 41
VOYAGEUR GRAND Wood Insert
R
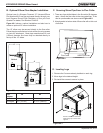
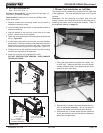
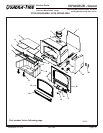
F. Standard Surround & Trim Kit Installation
StandardSize:43in.Wx31in.H
LargeSize:51in.Wx34in.H
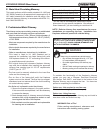
1. Lay surround face down on a protected surface to pre-
vent scratching.
2. Usinga 4 to6inches longPhillipshead screw driver
attach the side surrounds to the top surround using (2)
#8sheetmetalscrewsoneachsideprovidedwiththekit.
Figure 41.2.
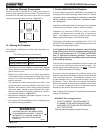
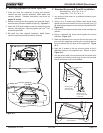
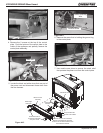
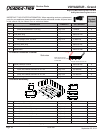
3. Laythetrimfacedownandplacethecornerbracketsinto
position.
4. Using a standard at screw driver tighten the corner
brackets.Figure 41.3.
5. Slidetheassembledtrimsetoverthesurroundset.and
then over the appliance matching the mounting tabs on
the side pieces with the slots on the appliance. Figure
41.2.
6. Alignthe 2 screws in the top surroundpiece to the 2
alignmentholesontheappliancetop.Secureinplace.
Figure 41.2.
7. Usethestrainreliefinthesurroundsideforblowercord
installation and use the cover plug to insert into the hole
where the blower cord is not installed.
Figure 41.2
Corner Brackets
Figure 41.3
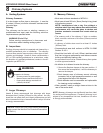
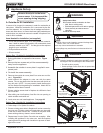
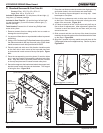
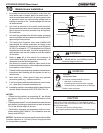
E. Securing Appliance to Stove Pipe/Liner
1. Once you have the appliance in place and secured,
remove the tube channel assembly, bafe board and
ceramic blanket. Detailed instructions are found on
pages 23 and 24.
2. Reachupthroughtheueopeningandgrabtheattach-
mentbarandpulldowninsideueopening.Figure 41.1.
3. Insertthe5/16boltsinsidethecastueandthroughthe
chimneymountingbar.Securelytightenthenuts.Fas-
teners are provided.
4. Re-install the tube channel assembly, bafe board,
ceramicblanketandbafeprotectionchannel.
Figure 41.1
5/16 Nuts
Attachment
Bar
5/16 Bolts
Strain Relief for
Blower Cord and
Cover Plug for hole
in each side
Secure 2 Sides to Top
Mounting Tabs
Slide into Slots
on Firebox Face
Secure to
Firebox Face