


Page 36
7075-166
September 25, 2012
R
VOYAGEUR GRAND Wood Insert
F. Prefabricated Metal Chimney
E. Metal Heat Circulating Masonry
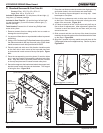
Thechimneycanbeneworexisting,masonryorprefabricated
andmustmeetthefollowingminimumrequirements:
•Mustbeminimum6inch(152mm)insidediameterof
hightemperaturechimneylistedtoUL103HT(2100
o
F)
orULCS628.
•Mustusecomponentsrequiredbythemanufacturerfor
installation.
•Mustmaintainclearancesrequiredbythemanufacturer
for installation.
•Refertomanufacturersinstructionsforinstallation
•This insert is listed to UL 1482 Standard and is
approved for installation into listed factory-built solid
fuel
replaceslistedtoUL127conformingtothefollow-
ingspecicationsandinstructions:
•The original factory-built clearance replace chimney
cap must be re-installed after installing the approved
chimneyliner meetingtype UL103HTrequirements
(2100°F)perUL1777.
•Thelinermustbesecurelyattachedtotheinsertue
collar and the chimney top.
•The air ow of the factory-built solid fuel replace
systemmustnotbealtered.Theuelinertopsupport
attachmentmustnotreducetheairowfortheexisting
air-cooled chimney system.
•Nodilutionairisallowedtoenterthechimney.
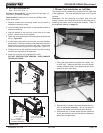
1. Securethereplacedamperintheopenposition.
If this cannot be accomplished, it will be necessary
to remove the damper.
2.Sealdamperareaofchimneyaroundchimney
connector with a high temperature sealant or seal
insertagainstthefaceofthereplace.
3. Both methods must be removable and replaceable
for cleaning and re-installation.
ThisinsertconformswiththesafetystandardUL-1482and
ULCS628(Canada)inallrespectsandisapprovedtoUL&
ULCsafetystandardsforinstallationandusewithinare-
placewithmasonrychimney,inaccordancewithNFPA211,
andCAN/CSA-B365-01.
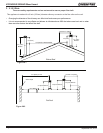
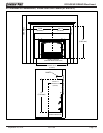
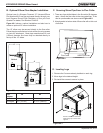
Minimum Width of Cavity Opening - Front
32-7/8* 835
Minimum Width of Cavity Opening - Rear
24* 610
Minimum Height
24* 610
Minimum Depth from Front to Rear
18* 457
Inches Millimeters
FireRisk.
Whenliningair-cooledfactory-builtchimneys:.
• RunchimneylinerapprovedtoUL1777Type
HTrequirements(2100degreesF)
• Re-installoriginalfactorybuiltchimneycap
ONLY
• DONOTblockcoolingairopeningsinchimney
• Blockingcoolingairwilloverheatthechimney
WARNING
NOTICE:InCanadawhenusingafactory-builtchimneyitmust
be safety listed, Type UL103 HT (2100
o
F) [1149
o
C] CLASS
“A” or conforming to CAN/ULC-S629M, STANDARD FOR
650
o
C FACTORY-BUILT CHIMNEYS.
NOTE: Refer to chimney liner manufacturer for recom-
mendations on supporting the liner. Installation into
replaces without a permit will void the listing.
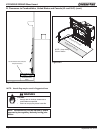
WARNING! Risk of Fire!
Followventingmanufacturer’sclearancesand
instructionswheninstallingventingsystem.
To maintain the functionality of the replace’s chimney
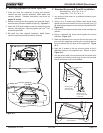
system you may use a Simpson Dura-Vent DuraLiner
SlipHanger,Part#4671,andattachtothebottomofthe
replacechimneycaptosupporttheliner.Youhavetwo
options to completing the installation.
Option one - Not required to use liner cap:
Re-attach the existing top of the chimney cap.
Option two - Using liner cap:
Re-attach the existing top of the chimney cap and install a
new storm collar and a new liner cap.
*Youwillneedtoaddadditionalclearancestothese
dimensionsforyourspecicinstallation.Alsoallowsuf-
cientclearanceifyouareinstallinganoutsideairkit.