


September 25, 2012
7075-166
Page 21
VOYAGEUR GRAND Wood Insert
R
5
Service Parts Replacement
A. Glass Replacement
(Replace with 5mm ceramic glass only)
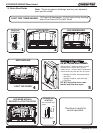
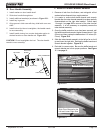
1. Ensurethatthereisoutandtheapplianceiscoolto
the touch.
2. Protect a table or counter top with padding or towels.
Protectyourhandsandwearglovestopreventinjury.
3. Removethedoorwiththebrokenglassbyliftingthe
door up and off of the hinges.
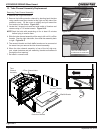
4.
Laydoorfacedownonatableorcountermakingsure
thehandlehangsovertheedgesothedoorlaysat,on
a soft surface.
5. Remove the screws from each glass retainer and remove
theglass.(Ifscrewsaredifculttoremove,soakwith
penetratingoilrst).
6. Centertheglasswithedgesevenlyoverlappingthe
opening in the door, (i.e. same space top and bottom,
left and right sides).
7. Replace the glass retainers. Be careful not to cross
thread the screws.
8. Tighteneachretainerjustafewturnsuntileachis
secured.Checkagainforcenteringofglassindoor
frame.Continuetotighteneachretaineralternately,a
few turns at a time, until the glass is secure. DONOT
OVERTIGHTEN-cancauseglasstobreak.
9. Replace the door on the appliance.
Quadra-Fireappliancesareequippedwithceramicsuper
heat-resistantglass,whichcanonlybebrokenbyimpactor
misuse.
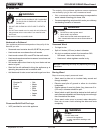
WARNING! Risk of Fire or Injury!
Useonlyglassthatisspeciedinthemanual,DONOT
replacewithanyothermaterial.Glassbreakagewilloccur.
CAUTION!
Handleglasswithcare.
• Inspectthegaskettoensureitisundamaged.
• DoNOTstrike,slamorscratchglass.
• DoNOToperateappliancewithglass&doorassembly
removed.
• DoNOToperatewithglasscracked,brokenor
scratched.
B. Snap Disc Replacement (Cont;d)
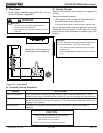
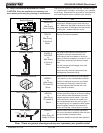
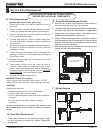
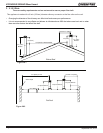
Figure 21.1 Snap Disc Location
1. Thegrilleonthebloweraccessassemblyishinged.Swing
the grille downward to expose the 2 screws. Figure 23.1
on page 23.
Blower Controls & Snap
Disc Under Ash Lip
Snap Disc
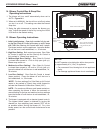
UNPLUG APPLICE FROM ANY POWER SOURCE
BEFORE REPLACING ANY COMPONENTS
White
Black
White
Black
Black
White
Blower
Snap Disc
Rheostat
Switch
Power Cord
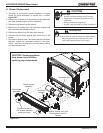
B. Snap Disc Replacement
2. Remove the 2 screws from the blower access assembly
and slide assembly away from the appliance
3.Locatethesnapdiscbracketassemblybehindtheblower
controls on the right side under the ash lip. Figure 22.1
4. Remove the 2 mounting screws in the blower control
bracketandslideassemblytowardsyou.
5. UsingaPhillipsheadscrewdriver,removethe2screws
from the snap disc and lift the snap disc off of the mounting
bracket.Disconectthewiresandreplacewithnewsnap
disc and re-connect the wires.
6. Slidetheblowercontrolbracketbackintopositionand
secure with the 2 mounting screws.
C. Wiring Diagram
Figure 21.2