


September 25, 2012
7075-166
Page 39
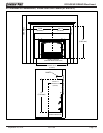
VOYAGEUR GRAND Wood Insert
R
A. Outside Air Kit Installation
Items Needed for Installation (not supplied)
• 4inchexaluminumpipe,orifusingalternatematerial,
then it shall be made from durable, non-combustible, heat
resistant material up to 350
o
F.Cutthepipetotherequired
length for your installation.
•Phillipsheadscrewdriver
•Siliconesealant
Figure 39.1
Asourceofair(oxygen)isnecessaryinorderforcombustionto
takeplace.Whatevercombustionairisconsumedbythere
mustbereplaced.Airisreplacedviaairleakagearoundwin-
dows and under doors. In homes that have tightly sealed doors
andwindows,anoutsideairsourceisneeded.AnoptionalOut-
sideAirKitisavail
able.
9
Appliance Set-up
WARNING
Donotdrawoutsidecombustionairfrom:
• Wall,oororceilingcavity
• Enclosedspacesuchasanatticorgarage
• Closeproximitytoexhaustventsor
chimneys
Fumesorodormayresult
Fire Risk.
Asphyxiation Risk.
Asphyxiation Risk.
LengthofoutsideairsupplyductshallNOTexceed
thelengthoftheverticalheightoftheexhaustue.
• Firewillnotburnproperly
• Smokespillageoccurswhendoorisopeneddue
to air starvation.
WARNING
Option One - Outside Air Installation Instructions
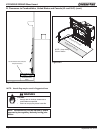
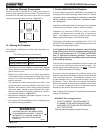
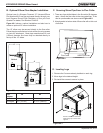
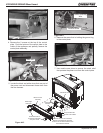
1. Swinggrilledowntoexposethetwoscrews.Figure
39.1
2. Remove the two screws and pull the access assembly
away from the appliance.
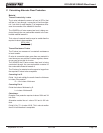
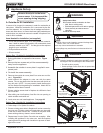
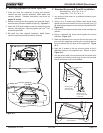
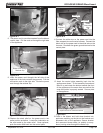
3. AssembletheoutsideaircoverplateAsuppliedincom-
ponentpack.
4. Re-install the access assembly.
5. Remove the outside air cover plate B on outer can and dis-
card
.
Figure 39.2.
6. Install optional ex adapter to outer can with the same
screws.Donotuseplasticwiretiesthatcomewiththekitas
theywillmelt.NOTE:Youmayneedtoinstalltheexpipe
intothereboxrstdependingoninstallation.Attachexto
adapater with at least 2 screws.
7. Ensureexistingaccessholeinreplaceissufcienttofeed
the4inchex.
8. Afterslidingcanintoreplace,feedexintocutopeningto
obtain outside combustion air.
9. Leveloutercanandinstallappliance.Seepage 40.
Option Two - Outside Air Installation Instructions
1.Followsteps1-5inOptionOneabove
2. Ensureexistingaccesholeinreplacewillnotbecoveredby
theoutercan.Existingoutsideairintakeholemaybeunder
attherearorsideofoutercan.Outsideairmayalsoenter
down existing chimney chase in some situations.
3. Repeatstep9underOptionOnewithoneexception.After
installingtheapplianceintheoutercan,sealthereplace
openingandtrimpackagewithinsulationtopreventairleak-
age into the room.
Outsideairinletmustbelocatedtopreventblockagefrom:
• Leaves,snow,iceorotherdebris
Blockmaycausecombustionairstarvation
Smokespillagemaysetoffalarmsorirritatesensitiveindi-
viduals.
WARNING
Asphyxiation Risk.
Grille hinges
downward
Remove Screws &
Pull Access Assembly
away from Insert
Remove Outside Cover
Plate A (Discard)
Outside Air Cover
Plate B (Discard)
Termination
Cap
Flex Adapter
Figure 39.2
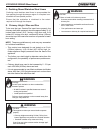
Remove the zip tie to the lower
access cover. It is to prevent the
cover opening during shipping.