


26
2 Maintenance
Copper-fin II/IIE Boiler, Water Heater and Pool Service Manual
Check all wiring
1. Inspect all wiring, making sure wires are in good condition
and securely attached.
Check control settings
1. Set the SMART SYSTEM control module display to
Parameter Mode and check all settings. See Section 1 of this
manual. Adjust settings if necessary. See Section 1 of this
manual for adjustment procedures.
2. Check settings of external limit controls (if any) and adjust
if necessary.
Check burner flame
Visually check main burner flames at each start-up after long
shutdown periods or at least every six months. The burner
viewports are located on either end of the appliance.
Perform start-up and checks
1. Start appliance and perform checks and tests specified in
Start-up Section of the Installation and Operation Manual.
2. Verify cold fill pressure is correct and that operating
pressure does not go too high.
The area around the burner viewport is hot
and direct contact could result in burns.
ƽ WARNING
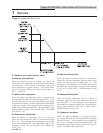
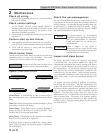
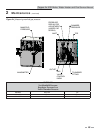
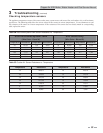
Figure 2-1_Flame Pattern Illustration
Normal Flame: A normal flame at 100% of burner input is
blue, with slight yellow tips, a well defined flame and no flame
lifting.
Yellow Tip: Yellow tipping can be caused by blockage or partial
obstruction of air flow to the burner.
Yellow Flames: Yellow flames can be caused by blockage of
primary air flow to the burner or excessive gas input. This
condition MUST be corrected immediately.
Lifting Flames: Lifting flames can be caused by over firing the
burner, excessive primary air or high draft.
If improper flame is observed, examine the venting system,
ensure proper gas supply and adequate supply of combustion
and ventilation air.
NORMAL
YELLOW FLAME
FLAME LIFT
YELLOW TIP
Check flue gas passageways
Any sign of soot around the refractory, at the burners, or in the
areas between the fins on the copper heat exchanger indicates a
need for cleaning. The following cleaning procedure must only
be performed by a qualified serviceman or installer. Proper
service is required to maintain safe operation. Properly installed
and adjusted units seldom need flue cleaning.
All gaskets/sealants on disassembled
components or jacket panels must be replaced
with new gaskets/sealants on reassembly.
Gasket and sealant kits are available from
your distributor.
NOTICE
ƽ CAUTION
When a Category IV vent system is
disconnected for any reason, the flue must
be reassembled and resealed according to the
vent manufacturer’s instructions.
Inspect and clean burner
The burner should be removed for inspection and cleaned
on an annual basis. An appliance installed in a dust or dirt
contaminated environment may require cleaning of the burner
on a 3 to 6 month schedule or more often, based on severity of
the contamination. The fan assisted combustion process may
force airborne dust and dirt contaminants, contained in the
combustion air, into the burner. With sustained operation,
non-combustible contaminants may reduce burner port area,
reduce burner input or cause non-warrantable damage to the
burner.
Use extreme care when operating an appliance for temporary
heat during new construction. Airborne contaminants such
as dust, dirt, concrete dust or drywall dust can be drawn into
the burner with the combustion air and block the burner port
area. An external combustion air filter is provided with the
appliance. This filter helps ensure clean air is used for the
combustion process. Check this filter every month and replace
when it becomes dirty. The burner of an appliance used for
temporary heat without a combustion air filter installed will
probably require a thorough cleaning before the unit is placed
into normal service.