


13
Section 1: Assembly & Set-Up
WC1503 Wood Chipper 328-085M
Table of Contents
12/15/15
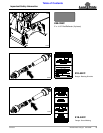
Driveline Hook-Up To Chipper
Refer to Figure 1-3 on page 12:
1. Remove lower lock nuts (#3) and bolts (#2). Rotate
drive shaft shield (#1) up.
2. Remove shaft protector (#9) from drive shaft (#8).
3. On shear bolt end of driveline (#10), push push-pin in
and hold while starting to slide universal joint onto
drive shaft (#8).
4. After universal joint starts onto the drive shaft,
release push-pin and continue to slide universal joint
on until push-pin releases and universal joint locks in
place. Move driveline back and forth to ensure it is
secured to the drive shaft.
5. Rotate drive shaft shield (#1) down and secure with
bolts (#2) and lock nuts (#3). Draw lock nuts up snug.
Tractor Hook-Up
!
DANGER
A Crushing Hazard exists when hooking-up equipment to a
tractor. Do not allow anyone to stand between tractor and
implement while backing-up to implement. Do not operate
hydraulic 3-Point lift controls while someone is directly
behind the tractor or near the implement.
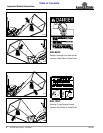
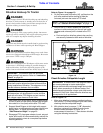
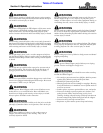
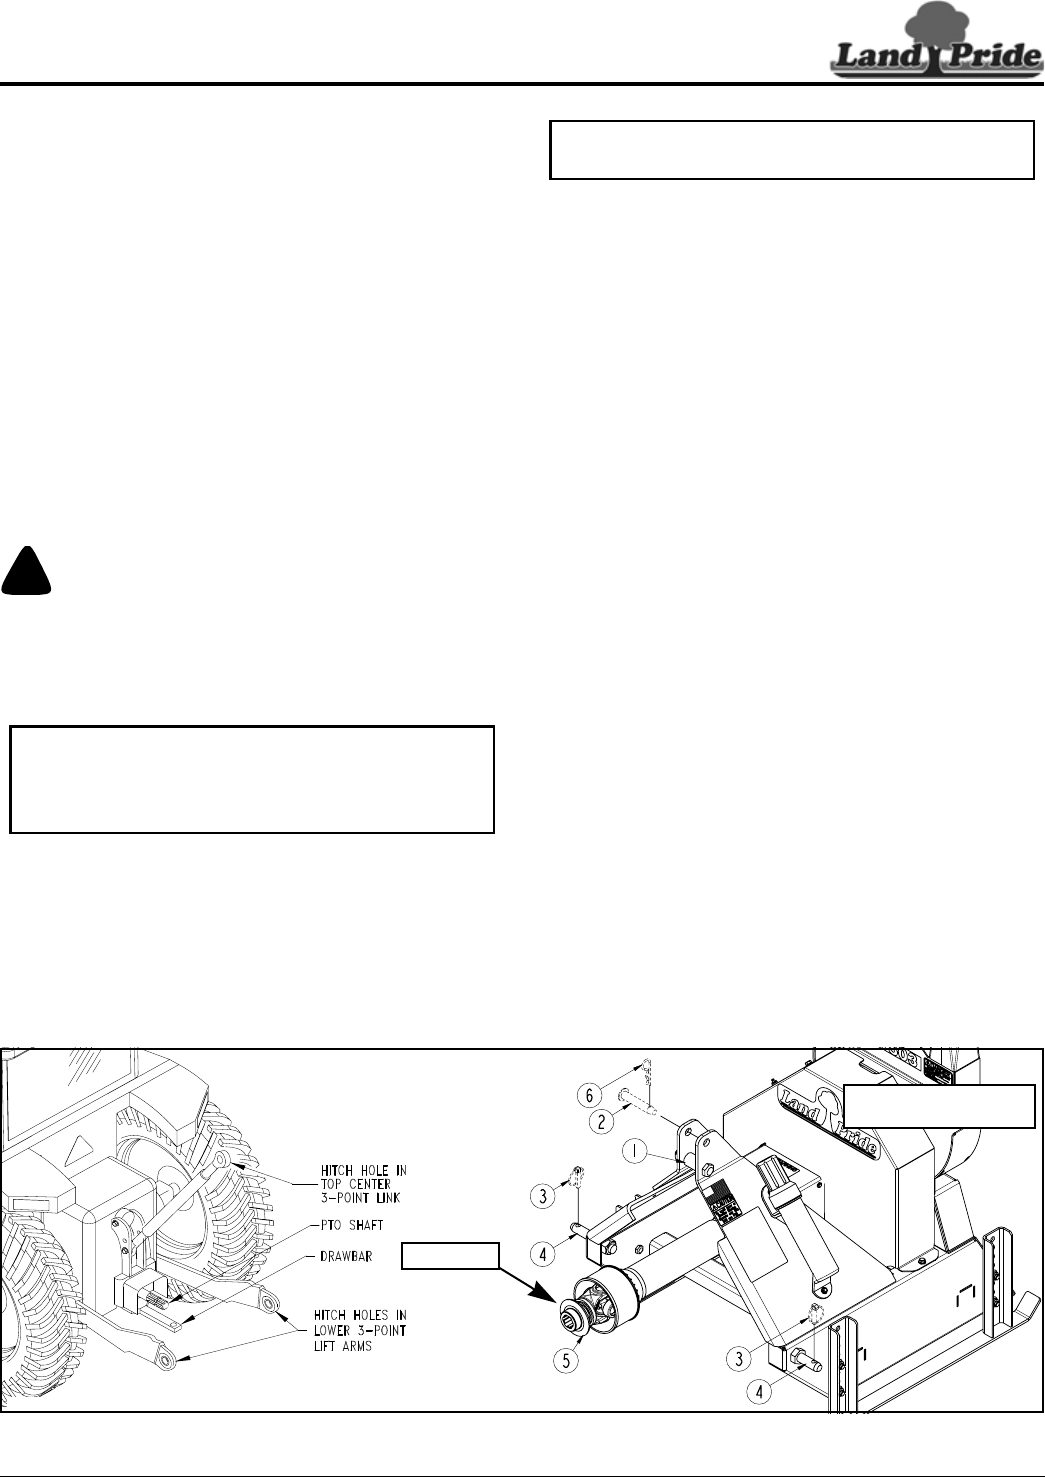
3-Point Hook-Up
Refer to Figure 1-4:
1. Slowly back tractor up to Wood Chipper while using
tractor’s 3-Point hydraulic control lever to align lower
lift arm hitch holes with hitch pins (#4)
2. Always disengage PTO, engage tractor park brake,
shut tractor engine off, and remove switch key before
dismounting from tractor.
NOTE: Land Pride’s Quick Hitch can be attached to
the tractor to provide quick and easy 3-point hook-
up and detachment. See your nearest Land Pride
dealer to purchase a Quick-Hitch.
3. Attach lower lift arms to hitch pins (#4). Secure hitch
pins with customer supplied linchpins (#3).
4. Connect top center link hitch hole to upper clevis
hitch with customer supplied 3/4" clevis pin (#2) and
customer supplied hairpin cotter (#6).
5. Ensure that the lower hitch arms are stabilized to
prevent excessive side movement.
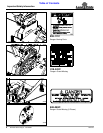
Quick Hitch Hook-Up
Refer to Figure 1-4:
1. Slowly back tractor up to Wood Chipper while using
tractor’s 3-Point hydraulic control lever to lower and
align lower Quick Hitch hooks in-line with and below
hitch pins (#4) and upper center hook in-line with and
below bushing (#1).
2. If needed, adjust top center link to align upper center
Quick Hitch hook just under bushing (#1).
3. Raise Quick Hitch up to catch lower hitch pins (#4) in
lower Quick Hitch hooks and upper bushing (#1) in
upper center Quick Hitch hook.
4. Release Quick Hitch locking handles to secure Quick
Hitch to hitch pins (#4).
Leveling The Wood Chipper
Refer to Figure 1-4:
1. From the tractor’s seat, slowly operate 3-Point
controls to raise skid extensions off the ground
several inches.
2. Manually adjust either one or both of the tractor’s
lower 3-Point arm height adjustments to level the
chipper from left to right. Some tractors have only a
single adjusting crank.
3. Manually adjust length of center 3-Point link to level
the Wood Chipper from front to back.
NOTE: Clevis pin (#2), linchpins (#3), and hairpin
cotter (#6) are supplied by the customer.
3-Point Hook-up
Figure 1-4
37298
23998
35287
Items 3, 4, & 7 are
Customer Supplied
Pull Collar