


16
Section 3: Adjustments
RBT55120 Rear Blades 301-172M
5/21/07
Land Pride
Table of Contents
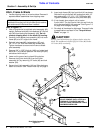
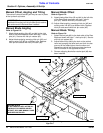
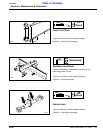
Blade Pitch
Blade pitch can be adjusted by lengthening or shortening
the tractor’s top center 3-point link.
Blade Offset
Manual Offset Adjustment
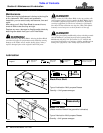
Refer to Figure 2-4 on page 12:
The blade offset has 15 adjustments up to 33" left or
right. (Center position, 7 positions right and 7 positions
left.)
1. Manually adjust blade offset by removing hitch
pin (#2) and moving outer link (#3) to a different hole
position.
2. Replace hitch pin and secure with hair pin
cotter (#5).
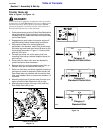
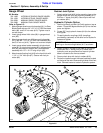
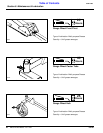
Hydraulic Offset Adjustment
!
CAUTION!
The blade may come in contact with the tractor rear tire when
offsetting blade to maximum position and angling blade in the
same direction to most severe angle.
Refer to Figure 2-1 on page 10:
The blade can be offset hydraulically by as much as 33"
to the right or left with the offset cylinder.
1. If the offset cylinder is attached to the selector valve,
make certain the valve lever is set to operate that
cylinder.
2. Operate tractor control lever to change blade offset
by as much as 33” right or left.
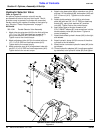
Blade Angle and Reversing
!
CAUTION!
Avoid injury from falling blade by always check to make sure
all hardware is secured properly before rotating blade.
Manual Angle Adjustment
Refer to Figure 2-4 on page 12:
There are 15 blade angle positions; up to 45 degrees
right or left. (Center, 7 clockwise and 7 counterclockwise
positions.)
1. Adjust blade angle by removing hitch pin (#2) and
moving outer link (#3) to a different hole position.
2. Replace hitch pin and secure with hair pin
cotter (#5).
IMPORTANT: Never fully extend hydraulic offset
cylinder or angle cylinder. Damage may occur.
3. The blade may also be rotated around 180 degrees.
a. Disconnect angling link from blade turntable lug.
b. Rotate Rear Blade clockwise 180 degrees.
c. Reconnect angling link to turntable lug.
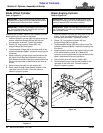
Hydraulic Angle Adjustment
!
CAUTION!
The blade may come in contact with the tractor rear tire when
offsetting blade to maximum position and angling blade in the
same direction to most severe angle.
Refer to Figure 2-2 on page 10:
Adjust blade angle with angling cylinder by as much as
45 degrees clockwise and counterclockwise.
1. If the angling cylinder is attached to the selector
valve, make certain the valve lever is set to operate
that cylinder.
2. Operate tractor control lever to change blade angle
by as much as 45 degrees forward or backward.
3. The blade may also be rotated 180 degrees.
a. Disconnect angle cylinder from blade turntable
lug.
b. Rotate 3-Way Rear Blade clockwise 180 degrees.
c. Reconnect angle cylinder to turntable lug.
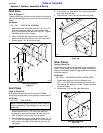
Blade Tilt
!
CAUTION!
Avoid injury from falling blade by always checking to make
sure all hardware is secured properly before tilting blade.
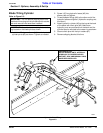
Manual Tilt Adjustment
Refer to Figure 2-4 on page 12:
The blade end can be tilted manually by as much 30
degrees with the ratchet jack.
1. Set ratchet lock and pump lever back and forth to
raise one end of the blade higher than the other end.
2. Reposition ratchet lock and pump lever back and
forth to tilt blade in the opposite direction.
Hydraulic Tilt Adjustment
IMPORTANT: Make sure the angling link is properly
re-installed before using the blade.
IMPORTANT: Never fully extend hydraulic offset
cylinder or angle cylinder. Damage may occur.
IMPORTANT: Make sure the hydraulic cylinder is
properly re-installed before using the blade.
Section 3: Adjustments