


13
Section 2: Options, Assembly & Set-Up
5/21/07
RBT55120 Rear Blades 301-172M
Land Pride
Table of Contents
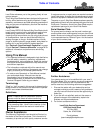
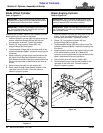
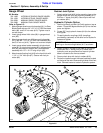
Ratchet Jack Option
1. Attach ratchet jack (#19) to the mounting lugs on the
gauge wheel arm (#3) and mounting bracket (#11)
with two 1" clevis pins (#20). Secure pins with hair
pin cotters (#21).
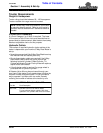
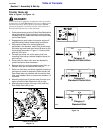
Hydraulic Cylinder Option
1. Position hydraulic cylinder (#15) with ports on top as
shown. Thread 90 degree elbows (#13) into the two
ports and tighten.
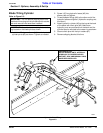
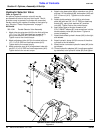
2. Screw 123" long hydraulic hoses (#14) to the elbows
and tighten.
3. Thread hydraulic couplings (#18) (couplings
provided by customer) to the other end of hydraulic
hoses and tighten.
4. Attach hydraulic cylinder to the lugs on the gauge
wheel with two 1" clevis pins (#17). Make sure
hydraulic ports are positioned on top and cylinder
base is located to the front as shown.
5. Secure clevis pins with hair pin cotters (#16).
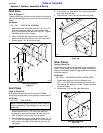
6. Route the hoses through the hose brackets located
on the top of the main frame and right side of the front
hitch. Connect hoses to tractor's hydraulic system.
IMPORTANT: Assemble base end of cylinder to the
front lug on the mounting bracket (#11) as shown.
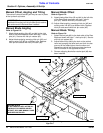
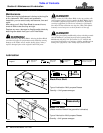
Gauge Wheel
Kit Bundles
301-149A HYDRAULIC SINGLE GAUGE WHEEL
301-150A HYDRAULIC DUAL GAUGE WHEEL
301-283A MANUAL SINGLE GAUGE WHEEL
301-248A MANUAL DUAL GAUGE WHEEL
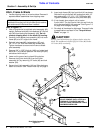
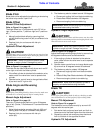
Refer to Figure 2-5:
1. Attach gauge wheel mounting bracket (#11) to Rear
Blade frame with two 3/4”-10 x 10 1/2” GR5 hex head
bolts (#8). and 3/4” hex nuts (#10). Tighten nuts to
correct torque.
2. Insert gauge wheel hitch tube (#9) in gauge wheel
arm (#3).
3. Attach gauge wheel arm (#3) to mounting bracket
(#11) with 3/4”-10 x 10 1/2” GR5 hex head bolt (#8).
and 3/4” hex nut (#10). Tighten nut to correct torque.
4. Insert gauge wheel caster assembly (single wheel
caster #1) or (dual wheel caster #2) in gauge wheel
arm (#3) and retainer washer (#4). Secure caster
assembly with 1/2” x 2 1/2” long roll pin (#5).
5. Attach center floating link (#12) to the front hitch with
1 1/4” x 1 3/4” hitch pin (#7). Secure with hair pin
cotter (#6).
Gauge Wheel Assembly
Figure 2-5
25505