


8
Section 1: Assembly & Set-Up
RBT55120 Rear Blades 301-172M
5/21/07
Land Pride
Table of Contents
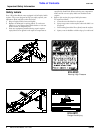
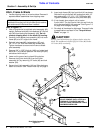
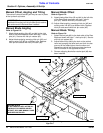
Hitch, Frame & Blade
1. Locate shipping crate on a level surface. Remove &
separate blade assemblies from shipping crate.
Refer to Figure 1-1:
2. Use a lifting device to set blade pivot assembly (#9)
upright. Remove bolts (#6), lock washers (#7) & pivot
cap (#8) from blade pivot assembly (#9). Do not
remove shipping block in the blade tilt housing.
3. Carefully insert blade pivot assembly (#9) into main
frame (#2) at a 90˚ angle to the frame.
4. Reinstall pivot cap (#8), lockwashers (#7) and
3/4"-16 x 1 3/4" GR5 hex head cap screws (#6).
Tighten hardware to secure main frame to blade
pivot assembly.
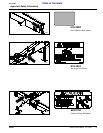
5. Remove 3/4" x 4 3/8" hitch pin (#10) and rotate jack
stand (#11) to a vertical position. Re-insert pin (#10)
and secure with lock pin.
6. Lower unit to ground and unhook lifting device.
7. Remove front pivot shaft (#3) from front hitch
assembly (#1) by removing 1/2" bolts (#5) and lock
washer (#4).
8. Secure front hitch assembly (#1) to a lifting device or
attach to a tractor. See “Tractor Hook-Up” on page 9.
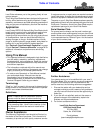
IMPORTANT: Do not remove shipping block from
the blade tilt housing until all cylinders and/or ratchet
jack and manual links have been installed.
9. Insert main frame (#2) into front hitch (#1) as shown.
Reinstall front pivot shaft (#3) and secure with 1/2”
lock washer(#4), 1/2"-13 x 1 1/2” GR5 bolts (#5).
Tighten hardware to secure front pivot shaft (#3).
10. If not already done, attach unit to tractor
3-point hitch. The top 3-point hitch pin and linch pin
are to be supplied by the customer. See Figure 1-3
on page 9 for category settings.
11. Re-check all hardware for tightness. Torque all bolts
to specifications as listed in the “Torque Values
Chart” on page 11.
!
CAUTION!
Always check all hardware for tightness before using the
blade. The moldboard will fall off if 3/4" bolts (#6) and/or
1/2" bolts (#12) are missing
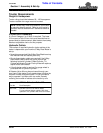
Rear Blade Assembly
Figure 1-1
12888
SHIPPING BLOCK
DO NOT REMOVE UNTIL AFTER ALL
HYDRAULIC CYLINDERS AND/OR
RATCHET JACK AND MANUAL LINKS
HAVE BEEN INSTALLED.