


11
Section 1: Assembly and Set-up
9/24/08
RCR2684 Rotary Cutter 312-785M
Land Pride
Table of Contents
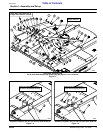
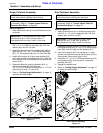
Single Tailwheel Assembly
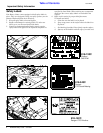
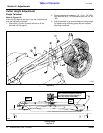
Refer to Figure 1-7:
1. Slide adjustment plate (#10) onto tailwheel arm (#1)
as shown.
2. Attach tailwheel arm (#1) to deck with
5/8”-11 x 3 1/4” GR5 hex head bolt (#2), 5/8” lock
washer (#3), and 5/8” nut (#4).
3. Assemble tailwheel adjusting brackets (#5 & #6) to
deck with four 1/2”-13 x 1 1/2” GR5 carriage bolts
(#7), 1/2” flat washers (#8), and 1/2” lock nuts (#9).
4. Install shim washer (#14) onto yoke spindle (#15)
and insert spindle into tailwheel arm (#1). Slide 2nd
shim washer (#14) onto yoke spindle and secure with
roll pin (#16).
5. Assemble tailwheel mounting bracket (#10), to
adjusting brackets (#5 & #6) with two
1/2” -13 x 1 1/2” GR5 hex head bolts (#11), 1/2” lock
washers (#12), and 1/2” nuts (#13).
6. Refer to “Cutting Height Adjustment” on page 16
to adjust tail wheel height.
Single Tailwheel Assembly
Figure 1-7
IMPORTANT: If chainguards are used, be sure to
install them before installing the tail wheel.
NOTE: Do not tighten hardware until assembly
is complete. Refer to “Torque Values Chart for
Common Bolt Sizes” on page 32.
IMPORTANT: If chainguards are used, install
tailwheel arm (#1) in rear hole as shown. If
chainguards are not used, install in front hole.
14384
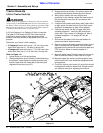
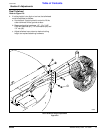
Dual Tailwheel Assembly
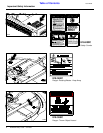
Refer to Figure 1-8:
1. Attach tailwheel arm (#1) to tailwheel bracket (#2)
with 5/8” -11 x 3 1/4” hex head bolt (#3), 5/8” lock
washer (#4), and 5/8” nut (#5).
2. Assemble tailwheel adjusting brackets (#6 & #7) to
cutting deck using four 1/2”-13 x 1 1/2” GR5 carriage
bolts (#8), lock nuts (#9) and flat washers (#17).
3. Install shim washer (#10) on spindle (#11). Insert
spindle into tailwheel arm and add 2nd shim (#10) to
yoke spindle. Secure with roll pin (#12).
4. Install two 1/2” -13 x 3 1/2” GR5 hex head bolts (#14),
lock washers (#15), and nuts (#16) in adjusting
brackets (#6 & #7).
5. Repeat for opposite side.
6. Refer to “Cutting Height Adjustment” on page 17
to adjust tail wheel height.
Dual Tailwheel Assembly
Figure 1-8
IMPORTANT: If chainguards are used, be sure to
install them before installing the tail wheel.
NOTE: Do not tighten hardware until assembly
is complete. Refer to “Torque Values Chart for
Common Bolt Sizes” on page 32.
IMPORTANT: If chainguards are used, install
tailwheel arm (#1) in rear hole as shown. If
chainguards are not used, install in front hole.
14385