


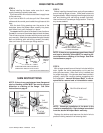
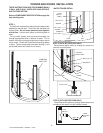
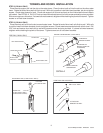

STEP 6
With a large screwdriver and the tool included with the
drain, tighten the inside compression nut to seal the
drain pipe connection. After drain is fully installed, test
for proper drainage. If the shower base does not drain
properly, rectify this condition before proceeding with
the installation. Jacuzzi Whirlpool Bath
©
is not re-
sponsible for removal and/ or reinstallation costs.
TIGHTEN SEALING NUT
TOOL
(INCLUDED)
POSITION BASE OVER CENTER OF
DRAIN PIPE AND SET INTO PLACE
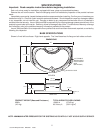
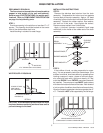
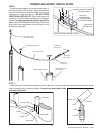
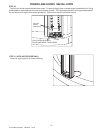
* ONLY WITH AIR TOWER UNITS
FLOW
SWITCH
CABLE*
(2X)
CONTROL
PANEL
CABLE*
STEP 4
Before installing the base, make sure the 4 water
supply hoses are routed to seat area.
If you have a With Air unit also route the air supply hose
to the seat area.
If you have a With Air unit also pull the 2 flow switch
cables and the control panel cable through base at this
time.
With the drain fitting passing over the center of the
drainpipe, lower the shower base carefully into place,
push down firmly until the base is in place.
You must check the level of the base in two directions.
Do not lift a corner of the shower base to level the base.
This will cause a loss of contact with the mortar and void
your warranty. Attach the shower base flange to the stud
wall and blocking with self-drilling screws (included).
Use a minimum of 3 screws per flange section.
NOTE: If there is any gap between base flange and
stud or blocking, shims MUST be used to prevent
distortion or cracking of the flange. See Shim
Instructions on page 6.
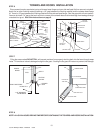
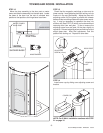
BASE INSTALLATION
GAP
TILE
FLANGE
INCORRECT
SHIM
STUD
CORRECT
TILE
FLANGE
STUD
USE
SCREWS
(PROVIDED
)
USE
SCREWS
(PROVIDED)
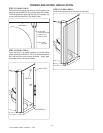
LOWER SEAT FRAME OVER
FLANGE ON BASE
APPLY
SEALANT
ON
FLANGE
SEAT FRAME
STEP 5
Before installing the seat frame, apply silicone sealant
around mating flange on base. Lower seat frame onto
flange and base. Attach the seat frame flange to the stud
wall and blocking with self-drilling screws (included).
Use a minimum of 3 screws per flange section. Clean up
any excess sealant.
6
Jacuzzi Whirlpool Bath
©
BZ00000 03/05
NOTE: If there is any gap between seat frame flange
and stud or blocking, shims MUST be used to pre-
vent distortion or cracking of the flange. See Shim
Instructions on page 6.
NOTE: Watertight installation of the drain is the
installer’s responsibility. Drain leakage is excluded
from the Jacuzzi Whirlpool Bath
©
warranty.
Replace the strainer and tape over the drain hole to
prevent finishing material from entering drain.
SHIM INSTRUCTIONS