


www.flexible-flyer.com 31-Rev. A 1-888-350-3015
Pictures / Fotografías /
Photo:
H
ar
d
ware
(
ac
t
ua
l
s
i
ze
b
u
t
f
or re
f
erence
only) / Herrajes (Tamaño real pero sólo
para referencia) / Illustrations de
quincaillerie à l'échelle 1 seulement pour
référence:
Instructions / Instrucciones / Instructions:
E
n
g
lish:
Sp
anish:
French:
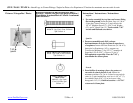
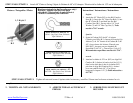
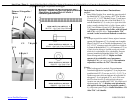
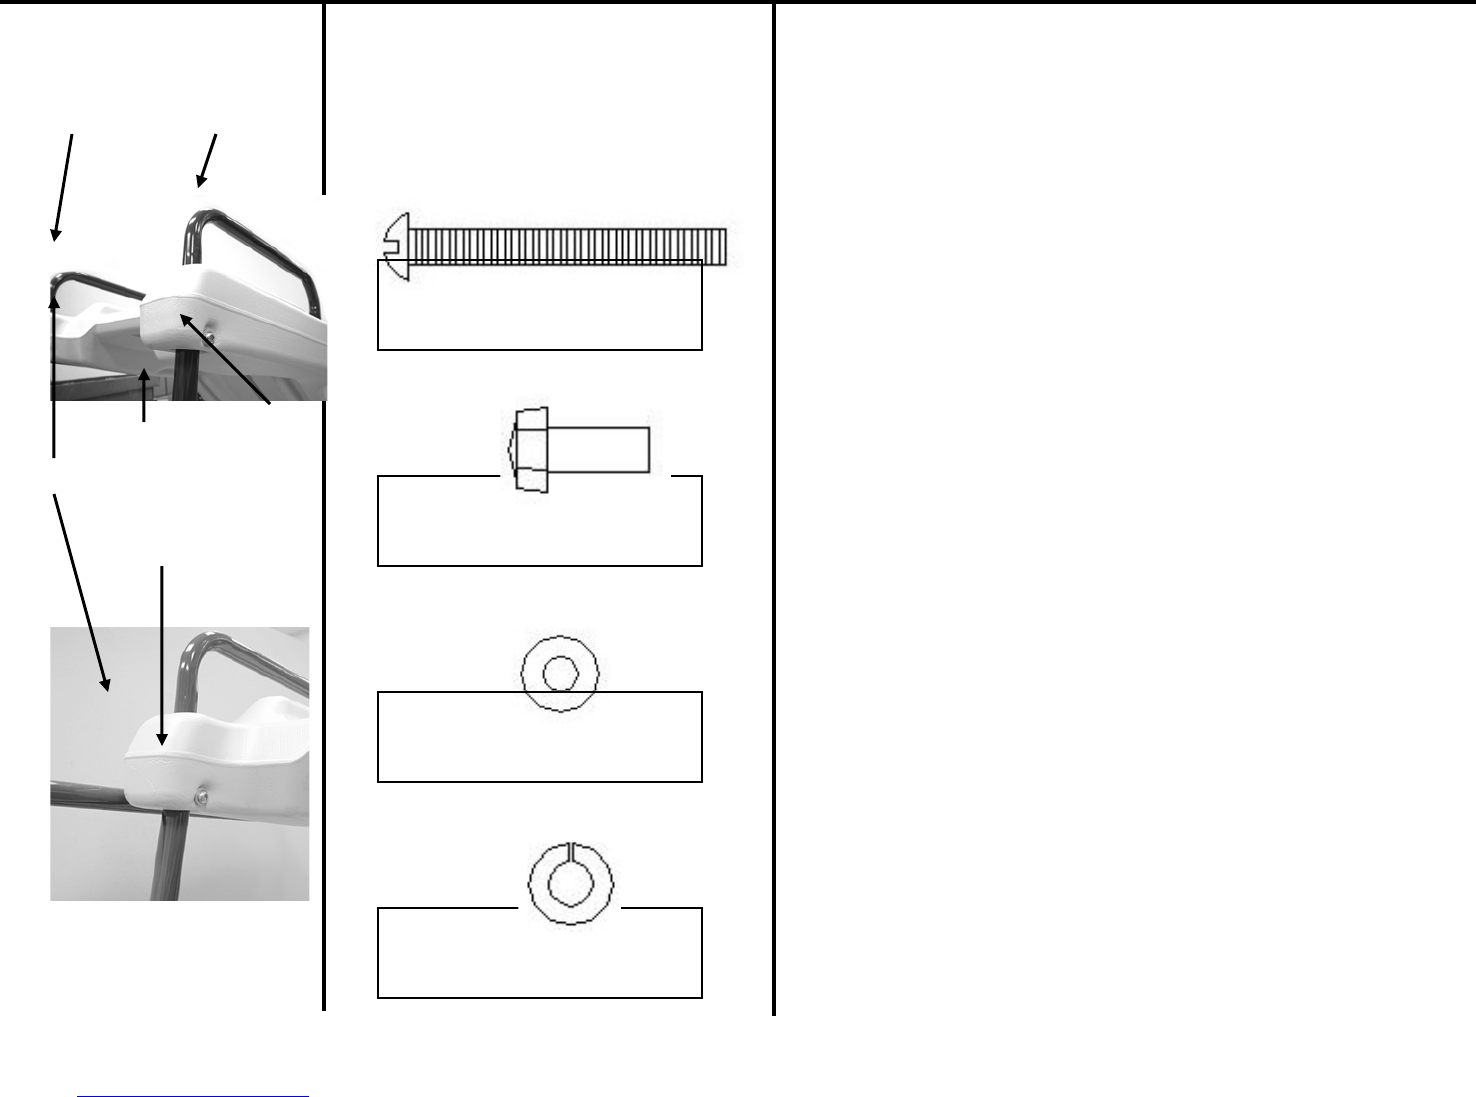
Step / Paso / Étape 2: Attach Slide Hand Rail to the Ladder Rail and Slide Bed / Sujete el Pasamanos de la Resbaladilla al Riel de Escalera y
Cama de la Resbaladilla / Fixation des poignées de toboggan aux montants de l'échelle et à la glissière du toboggan
8 &/y/et 3
C-1
C-3
C-2
6 &/y/et 2
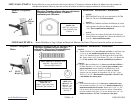
2. Insert the thru hole ends of the assembled Ladder Rails (C-2) into the holes on
the underside of the Slide Bed (C-1). I Now, insert the grommet (C-6) onto the
each end of the Hand Rails (C-3). Insert the Hand Rail (C-3), with two holes,
into the holes at the top of the Slide Bed and into the thru hole end of the Ladder
Rail and align the holes. Place a 9/32” Flat Washer (2) on a 1/4” x 2-1/4”
Machine Screw (6). Insert Machine Screw (6) through the hole in the side of the
Slide Bed (C-1), the Ladder Rail (C-2), and the Hand Rail (C-3) on the back
right hand side (when standing behind slide) of slide. Secure with a 5/16” Lock
Washer (8) and a 1/4” Hex Barrel Nut (3). Repeat on opposite side of slide
bed, with left hand rail (C-4), with four holes. Tools needed a 7/16” wrench /
socket wrench and flathead screwdriver.
2. Insérer les extrémités à trous traversant des montants d'échelle (C-2) dans les
trous du côté inférieur de la glissière du toboggan (C-1). Insérez la rondelle (C-6)
dans chacune des extrémités des poignées du toboggan (C-3). Insérez la poignée
(C-3), comportant deux trous, dans les orifices au sommet de la glissière du
toboggan et à travers les orifices à l'extrémité du montant d'échelle et alignez les
orifices. Placez une rondelle plate 9/32” (2) sur les vis 1/4” x 2-1/4” (6). Insérez
les vis (6) dans les trous latéraux de la glissière du toboggan (C-1), du montant
d'échelle (C-2) et de la poignée (C-3) du côté arrière droit (lorsque vous êtes
derrière le toboggan) du toboggan. Assurez avec une rondelle-frein 5/16” (8) et
un écrou à tête hexagonale 1/4” (3). Répéter cette opération du côté opposé de
la glissière, avec la poignée gauche (C-4), comportant quatre orifices. Outils
nécessaires une clé 7/16", clé à douille et tournevis à lame plate.
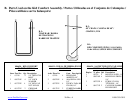
ITEM/ ARTÍCULO/ ARTICLE #6
000706P – Qty Used / Cant.
Utilizada / Qté Utilisée: 1
ITEM/ ARTÍCULO/ ARTICLE #3
02434 – Qty Used / Cant. Utilizada
/ Qté Utilisée: 1
ITEM/ ARTÍCULO/ ARTICLE #8
000891P – Qty Used / Cant.
Utilizada / Qté Utilisée: 1
ITEM/ ARTÍCULO/ ARTICLE #2
001812P – Qty Used / Cant.
Utilizada / Qté Utilisée: 2
C-4
2. Inserte los extremos con orificio pasante de los Rieles de Escalera (C-2) dentro de
los orificios en el lado por debajo de la Cama de Resbaladilla (C-1). Ahora,
inserte el anillo de refuerzo (C-6) en cada extremo de los Pasamanos (C-3).
Inserte el Pasamanos (C-3), con dos orificios, dentro de los orificios en la parte
superior de la Cama de Resbaladilla y dentro del extremo con orificio pasante del
Riel de Escalera y alinee los orificios. Coloque una Arandela Plana (2) de 9/32”
en un Tornillo de Máquina (6) de 1/4” x 2-1/4”. Inserte un Tornillo de Máquina
(6) a través del orificio en el lado de la Cama de Resbaladilla (C-1), el Riel de
Escalera (C-2), y el Pasamanos (C-3) en el lado derecho trasero (cuando usted
está parado detrás de la resbaladilla) de la resbaladilla. Asegure con una
Arandela de Seguridad (8) de 5/16” y una Tuerca Hex (3) de 1/4”. Repita en el
lado opuesto de la cama de resbaladilla, con el pasamanos izquierdo (C-4),
con cuatro orificios. Herramientas requeridas: una llave de 7/16” / llave de
cubo y atornillador de cabeza plana.