


GB - 25
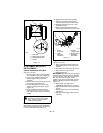
Check Attachment Idler Arm Roller
Clearance
(Figure 22)
1. Remove the bottom cover.
2. With the attachment clutch lever
engaged, check the clearance between
the frame and plastic roller on the lower
end of the attachment idler arm
(Figure 22).
• If roller is 1/2 – 7/8 in. (12.7 –
22.2 mm) from frame no further
adjustment is required.
• If roller is less than 1/2 in. (12.7 mm)
from frame, loosen idler adjustment
nut and move idler closer to the belt.
Tighten adjustment nut and recheck
the roller clearance.
• If roller is more than 7/8 in. (22.2 mm)
from frame, loosen idler adjustment
nut and move idler away from the belt.
Tighten adjustment nut and recheck
roller clearance.
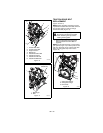
Check Attachment Brake
(Figure 23)
1. With the attchment clutch lever
disengaged, brake pad must contact
attachment belt. With attachment clutch
lever engaged, brake pad must be more
than 1/16 in. (1.6 mm) from belt. If there
is more than 1/16 in. (1.6 mm) gap, go to
Check Belt Finger Clearance on
page 26. If there is less than 1/16 in.
(1.6 mm) gap, go to step 2.
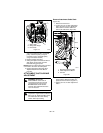
2. If there is less than 1/16 in. (1.6 mm)
gap between brake pad and belt, follow
these steps:
a. To increase brake pad gap,
loosen idler adjustment nut, and
move idler away from belt.
Position idler to achieve a 1/16 in.
(1.6 mm) minimum brake pad
gap and a 1/2 – 7/8 in. (12.7 –
22.2 mm) gap between the
plastic roller and the frame.
IMPORTANT: If adjustments cannot be
brought into specified ranges see your Dealer
for repairs.
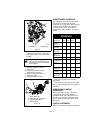
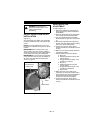
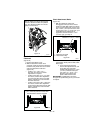
Figure 21
OS7188
With the attachment clutch disengaged,
check the attachment idler arm position
here. The attachment idler arm should
lightly touch the frame.
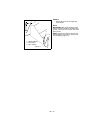
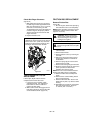
Figure 22
OS8080
Roller should be 1/2 – 7/8 in.
(12.7 – 22.2 mm) from the frame when
the attachment clutch is engaged.
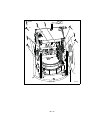
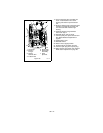
Figure 23
OS8092
Minimum of 1/16 in. (1.6 mm)
1. Brake Arm and Pad
2. Attachment Pulley
1
2