


GB - 14
Fuel Stabilizer
Gasoline left in the fuel system for extended
periods without a stabilizer will deteriorate,
resulting in gum deposits in the system.
These deposits can damage the carburetor
and the fuel hoses, filter and tank. Prevent
deposits from forming in the fuel system
during storage by adding a quality fuel
stabilizer to the fuel. Follow the
recommended mix ratio found on the fuel
stabilizer container.
PRE-START
1. Check Function of Clutches
Brush must stop quickly when attachment
clutch lever is released.
Wheels must stop quickly when traction drive
clutch lever is released.
If clutches do not engage or disengage
properly, adjust or repair before operation
See Service and Adjustments on page 21.
2. Check Dual Handle Interlock
Without the engine running, press down
(engage) both clutch levers. Release
attachment clutch lever. Attachment clutch
should remain engaged until traction clutch
lever is released, then both clutches must
disengage.
If clutches do not engage or disengage
properly, adjust or repair before operation.
See Attachment Clutch/Brake Adjustment on
page 24.
3. Adjust Brush
Adjust brush height and angle before
operation. See Brush Angle Adjustment on
page 12 and Brush Height Adjustment on
page 12.
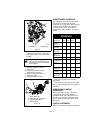
4. Check Engine Fuel and
Crankcase Oil
Check and add fuel if required. Check that
the engine crankcase oil is full using dipstick.
Refer to Engine Manual for detailed
instructions.
TO STOP IN AN EMERGENCY
Immediately release both control levers to
stop unit in an emergency. Stop engine and
wait for all rotating parts to stop before
leaving operator’s position.
STARTING AND SHUT OFF
IMPORTANT: At start-up, allow unit and
engine to adjust to the outside temperature
before operating. Before shut-off, run unit a
few minutes to prevent freeze-up.
NOTE: Try out each control without the
engine running to see how they work and
what they do.
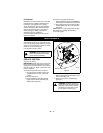
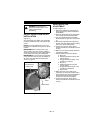
Manual Start
1. Make sure that the traction clutch and
attachment clutch levers are fully
disengaged.
2. Open fuel shutoff valve.
3. Set the engine shut-off switch to the
"On" position to start and operate the
engine.
4. If engine is cold, apply choke. A warm
engine requires less choking than a cold
engine. See Engine Manual for detailed
instructions.
5. Set throttle to proper starting position.
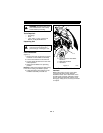
6. Grasp starter handle and pull rope out
slowly until it pulls harder. Let rope
rewind slowly.
7. Pull rope with a rapid continuous full arm
stroke. Let rope rewind slowly.
IMPORTANT: DO NOT let Starter Handle
snap against Starter.
8. Repeat until engine starts. (If engine
does not start, refer to Troubleshooting
on page 28.)
9. Adjust choke as needed.
10. Set throttle to Part Throttle or Slow
position to adapt to outside temperature
or travel speed. Set throttle to Fast
position for normal operation.
Electric Start (120V)
1. Connect extension cord to starter.
IMPORTANT: Prevent damage to unit. Know
voltage of your starter and only use matching
outlets.
2. Plug extension cord into 120V 3-wire,
grounded outlet.
IMPORTANT: Use only Ariens extension cord
(P/N 02483100) or an equilavent cord that is
rated for a minimum of 13 amps, grounded,
UL listed, CSA certified and labeled as
suitable for outdoor use.
WARNING: AVOID INJURY. Read
and understand the entire Safety
section before proceeding.
WARNING: FAILURE TO FOLLOW
INSTRUCTIONS could result in
personal injury and/or damage to
unit. DO NOT attempt to start your
unit at this time. Read entire
Owner/Operator Manual and the
Engine Manual first.