


MAINTENANCE
INTERSTATER 02/11 Maintenance Section 5-10
© 2011 Alamo Group Inc.
MAINTENANCE
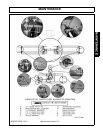
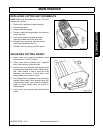
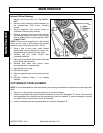
Inboard (Drive) Bearing
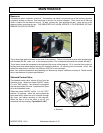
1. Remove spring from idler arm. Fig. Mnt-FL-
0013
2. Remove motor mounting bracket fasteners, at
the cutterhousing. Pivot motor- mounting
bracket
3. Remove fasteners that secure pulley to
cuttershaft. Remove pulley and key.
4. Remove fasteners securing inboard bearing
and housing assembly to cutter- housing, then
remove bearing and housing assembly. Refer
to Mnt-FL-0011
NOTE: There are two tapped holes in the housing
which can be used to pull bearing and housing
assembly out by using special tool No. 701627.
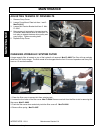
5. Using a jack to align parts, install inboard
bearing and housing assembly to cutter unit.
Grease bearing and install cap over fitting.
6. Reinstall key and pulley. Secure with
cuttershaft fasteners.
7. Remove jack and check shaft rotation. Reinstall
knives which were removed.
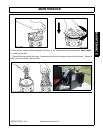
8. Reinstall drive belts then secure motor
mounting bracket to cutterhousing.
9. Reinstall idler arm spring.
10. Reinstall belt guard.
11. Remove supports, lower unit to ground and test
unit.
12. Reinstall outboard fender, if not already
installed.
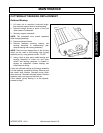
CUTTERSHAFT REPLACEMENT
NOTE: It is recommended that cuttershaft bearing and housing assemblies be replaced when replacing cutter-
shaft.
1. Place unit on the ground or securely support at a convenient height.
2. Remove cuttershaft bearing and housing assemblies as outlined in Paragraph "E", above. After removing
both assemblies, the cuttershaft can be removed and a new one installed. It may be necessary to remove
two sets of knives nearest the drive end of cuttershaft.
3. Install new bearing and housing assemblies as outlined in Paragraph "E".