


20 Service
MAN0458 (9/23/2005)
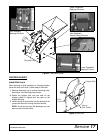
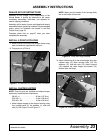
Front Belt Installation
1. Place belt around both sheaves.
2. Attach idler pulley to idler bracket using hardware
previously removed.
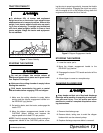
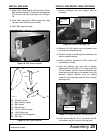
3. Tighten eyebolt until belt deflection is 7/16" when a
20 lb load is placed against the belt. See Figure 9.
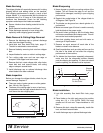
Figure 9. Belt Tension
4. Attach bearing support weldment to the chipper
housing using hardware previously removed.
5. Attach belt shield to the chipper housing using
hardware previously removed.
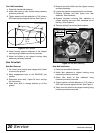
Rear Drive Belt
Rear Belt Removal
1. On a hard, level surface lower chipper with 3-point
lift arms to the ground.
2. Move engagement lever to the RELEASE (up)
position.
3. Disconnect drive shaft, 3-point lift arms, and top
link from tractor.
4. Place drive shaft in storage position up off the
ground.
5. Remove rear belt shield from the chipper housing
and save hardware.
6. Loosen the eyebolt to release tension on the belt.
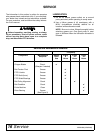
7. Remove hardware and idler pulley from idler
weldment. Save hardware.
8. Remove hardware securing idler weldment to
chipper housing and move idler weldment out of
the way. Save hardware.
9. Remove old belt from around both sheaves.
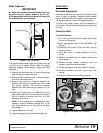
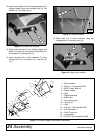
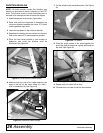
Figure 10. rear Belt Assembly
Rear Belt Installation
1. Place belt around both sheaves.
2. Attach idler weldment to chipper housing using
hardware previously removed.
3. Attach idler pulley to idler weldment using
hardware previously removed.
4. Tighten eyebolt until belt deflection is 7/16" when a
20-lb load is placed against the belt. See Figure 9.
5. Attach rear belt shield to the chipper housing using
hardware previously removed.
Span Length
Force
20 lb
7/16" Deflection
LA4
Eyebolt
Belt
Idler Pulley
Idler
Weldment
DP3