


Tilling Under Corn
After corn is harvested, the stalks should be tilled into the soil
while still green. Dry plants are more difficult to till under, and
the roots break loose too easily.
NOTE: Do not pull the roots out by hand or cut the stalks before
tilling. Stalks that are firmly anchored by their roots are much
easier for the tines to chop, cut, and work under.
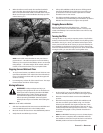
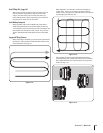
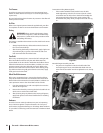
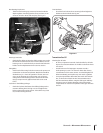
As you move forward into a row of stalks, aim the tiller
so that the stalks go between the left wheel and the
transmission case. See Fig. 4-17. Do not use the right wheel
because damage could occur to the air cleaner, carburetor
or throttle linkage.
Each new pass should overlap the previous pass by one-
half the width of the tiller.
Till as deeply as possible. Pull the Depth Regulator all the
way UP and engage the lowest notch for deep tilling. Use
either LOW or HIGH belt range and SLOW wheel speed gear
position. Let the tilled-in stalks decompose for a week or
so. Then till in the remaining residue as deep as possible.
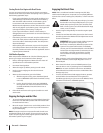
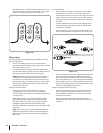
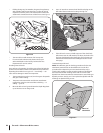
PTO Power Feature
Your tiller is a self-contained PTO (Power Take-Off) Power
machine that was shipped with a tine attachment installed. The
tine attachment can be quickly removed and replaced with other
optional attachments. See Fig. 4-18. The following instructions
will familiarize you with your PTO Power machine. Please read
these pages carefully. The following steps explain how to remove
and replace the tine attachment. You will need a ⁄” wrench,
minimum 12” long for leverage.
NOTE: Before operating your PTO Power machine for the first
time, make sure that you have Read all the safety instructions in
the Safe Operation Practices section of this manual and in the
as well as the manual supplied with any attachment. Read the
controls information and operating procedures for the tiller and
engine described in the Assembly & Set-Up and the Controls &
Features sections. Also be sure to read the Engine Operator’s
Manual.
1.
2.
3.
Removing the Tine Attachment
Move the tiller to level ground.
Be sure the engine is stopped, the electric start key is
removed, and the spark plug wire is disconnected and
moved away from spark plug.
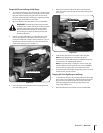
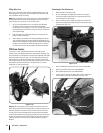
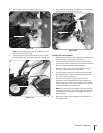
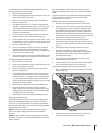
Place a sturdy support under the engine to prevent the
engine from tipping forward when the tine attachment is
removed. See Fig. 4-19.
Place the Wheels/Tines/PTO Drive Lever into NEUTRAL.
Place Tines/PTO Clutch Lever in DISENGAGE.
Place Wheel Speed Lever into FREE WHEEL.
Loosen the two swing-out bolts that connect the power
transmission to the tine attachment. See Fig. 4-20.
1.
2.
3.
4.
5.
6.
7.
Figure 4-12
Figure 4-19
Swing-Out Bolts
Figure 4-20
22 sectiOn 5— OperatiOn