


1
Table of Contents
SAFETY RULES
Recommended Accessories .......................1
Safety Rules..................................................2
FEATURES & CONTROLS
Control Functions ........................................3
OPERATION
Checks Before Starting................................4
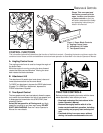
Engine & Ground Speed Selection.............4
Transporting .................................................4
Operating On Slopes....................................4
Starting & Stopping......................................4
Changing Blade Angle.................................5
Dozing Tips...................................................5
Snow Plowing Tips.......................................5
STORAGE
Daily Storage ................................................5
Off-Season Storage......................................5
MAINTENANCE
Schedule for Normal Care ...........................6
Lubricate Dozer Blade .................................6
TROUBLESHOOTING
Troubleshooting Chart.................................7
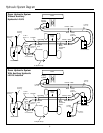
Hydraulic System Diagram..........................8
ADJUSTMENTS
Skid Shoe Adjustment .................................9
Rotate / Replace Scraper Bar......................9
Lift Height Adjustment.................................9
Downward Pressure Adjustment................9
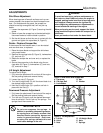
Recommended Accessories
Tire chains and Simplicity Quick Tach weights are rec-
ommended when installing this attachment on your trac-
tor. Quick Tach weights are an easy way to improve trac-
tion and stability making your dozer more efficient.
Quick Tach weights are easy to install and remove, and
can be added in 50 lb. increments (maximum of 300 lbs).
To purchase tire chains, Quick Tach weights, or wheel
weights, see you Simplicity Dealer.
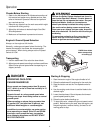
For operation on slopes greater than 15% (8.5°), Quick
Tach Weights, tire chains, and wheel weights are recom-
mended. Never operate on slopes greater than 30%
(16.7°).
© Copyright 1997 Simplicity Manufacturing, Inc.
All Rights Reserved. Printed in USA.
TP 100-2137-00-AT-SMA
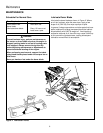
INITIAL ASSEMBLY & INSTALLATION
Attach Dozer Lift Arm ................................10
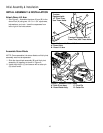
Assemble Dozer Blade...............................10
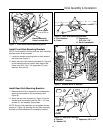
Install Front Hitch Mounting Brackets .....11
Install Rear Hitch Mounting Brackets.......11
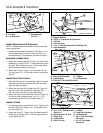
Install Attachment Lift extension..............12
Assemble Ladder Hitch .............................12
Install Hitch Onto Tractor ..........................12
Install Lift Rod ............................................12
Install Dozer Blade .....................................13
Install New Master Valve............................14
Install Cross Over Tubes...........................15
Install Bypass Hose & T-Connector .........16
Assemble Control Arm ..............................16
Install Control Valve...................................17
Install Hydraulic Cylinder On Dozer ........19
DOZER & HITCH REMOVAL
Dozer & Hitch Removal..............................21
NORMAL INSTALLATION
Install Hitch Onto Tractor ..........................22
Install Lift Rod ............................................22
Install Dozer Blade .....................................22
HARDWARE IDENTIFICATION &
TORQUE SPECIFICATIONS
Chart............................................................24
NOTE: In these instructions, “left” and “right” are
referred to as seen from the operating position.