


22
Normal Installation
NORMAL INSTALLATION
Install Hitch Onto Tractor
1. Slide the hitch and lift rod assembly under the tractor.
Use 4x4 wood blocks to support the hitch and help
align the mounting holes.
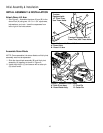
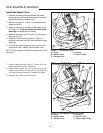
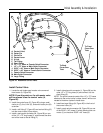
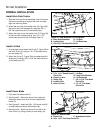
2. Attach the rear end of the ladder hitch (B, Figure 38)
the to the rear hitch brackets (A) using two 5/8 x 1-
5/8” flat head clevis pins (C) and safety clips.
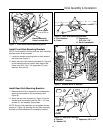
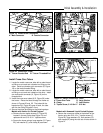
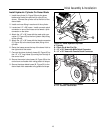
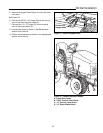
3. Attach the front end of the ladder hitch (D, Figure 39)
to the front hitch brackets using two 1/2 x 1-1/2”
round head clevis pins (A) and safety clips (C).
Install Lift Rod
1. If not already done, attach the lift rod (F, Figure 39) to
the hitch lift arm (E) using a 1/2 x 2” flat head clevis
pin and safety clip.
2. Attach the lift rod (F, Figure 39) to the attachment lift
extension (H) using a 5/8 x 1-5/8” flat head clevis pin
(I) and safety clip (C).
Figure 38. Rear Brackets & Lift Extension
A. Rear Hitch Brackets D. Lift Rod
B. Ladder Hitch E. Lift Extension
C. 5/8x1-5/8” Flat Head Clevis Pin
A
E
D
C
B
Front
C
Figure 39. Lift Rod
A. 1/2 x 1-1/2” Round Head F. Lift Rod
Clevis Pin G. Front Hitch Bracket
B. Dozer Lift Arm H. Lift Extension
C. Safety Clip I. 5/8 x 1-5/8” Flat Head
D. Ladder Hitch Clevis Pin
E. Hitch Lift Arm J. 1/2 x 2” Flat Head
Clevis Pin
I
C
D
E
F
G
H
B
J
A
C
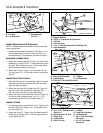
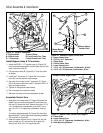
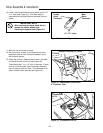
Install Dozer Blade
1. Fully lower the attachment lift.
2. See Figure 40. Attach the dozer to the tractor by
resting the dozer pins (A) on the front attachment
hooks (C).
3. See Figure 40. Install two 5/8 x 1-5/8 clevis pins (B)
on both sides and secure with safety clips.
4. See Figure 39. Attach the dozer lift arm (B) to the
hitch lift arm (E) using a clevis pin and safety clip.
Figure 40. Attach Dozer
A. Dozer Pins C. Attachment Hooks
B. 5/8 x 1-5/8” Flat Head Clevis Pin
A
B
C