


11
Initial Assembly & Installation
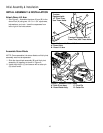
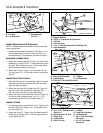
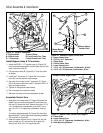
Figure 9. Drawbar Bolts & Washers
Capscrews &
Washers
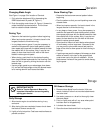
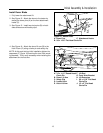
Figure 10. Rear Hitch Brackets
A. Bracket C. Capscrew, 5/8-11 x 2”
B. Washer, 5/8
A
B
C
Install Rear Hitch Mounting Brackets
1. Remove the front four capscrews and lockwashers
securing the drawbar to the transmission (see
Figure 9).
2. Attach the rear hitch brackets (A, Figure 10) to the
drawbar and transmission with the 5/8-11 x 2” cap-
screws (C) and washers (B) provided.
NOTE: During initial installation do not tighten the cap-
screws (C, Figure 10) securing the rear hitch mounting
brackets until the attachment is completely installed.
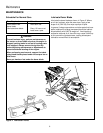
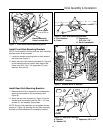
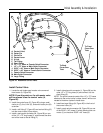
Install Front Hitch Mounting Brackets
NOTE: Once installed, the front and rear hitch mounting
brackets need not be removed.
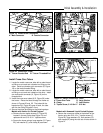
1. Locate the bracket mounting holes on both sides of
the frame (see Figure 7).
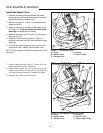
2. Attach the front hitch mounting brackets (A, Figure 8)
to the bracket mounting holes in both sides of the
frame using 5/16-18 x 1-1/4 capscrews (C), lock-
washers, and nuts (D).
Figure 8. Front Hitch Mounting Brackets
A. Hitch Bracket C. Capscrews,
B. Frame 5/16-18 x 1-1/4”
D. Nut & Lockwasher
A
D
B
C
Figure 7. Front Hitch Bracket Mounting Holes
Bracket Mounting
Holes Located Here
Front