


16
Section 2: Options & Accessories
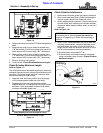
RCD1884 Rotary Cutters 326-355M
12/15/15
Table of Contents
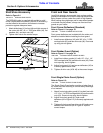
Rear Metal Band Guard (Standard)
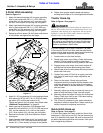
Refer to Figure 2-4 on page 17:
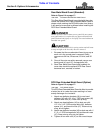
326-464A RCR1884 REAR METAL BAND Guard
This Rear Metal Band Guard is provided with the cutter
unless the optional RCD Rear Extended Metal Guard is
chosen when ordering the RCD1884 cutter from factory.
It will need to be removed as follows before installing the
RCD Rear Extended Metal Guard.
!
DANGER
Do not operator cutter without a rear guard. Do not remove
rear guard unless it is replaced by an approved Land Pride
guard. Serious body injury or loss of life can result without an
attached rear guard.
!
CAUTION
The Rear Metal Band Guard is in spring tension and will want
to snap straight as the hex whiz nuts are removed.
1. Be aware that the curved ends will want to pop up as
each nut in the curved area is removed. Safely
remove nuts 3A first, 3B second, 3C third, and 3D
last.
2. Once all the nuts are safely removed, remove rear
band guard (#1) and 1/2" carriage bolts (#2).
3. Store Rear Metal Band Guard and hardware for
reuse later should the optional RCD Rear Guard
becomes bent, cracked, or broken.
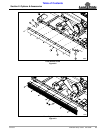
RCD Rear Extended Metal Guard (Option)
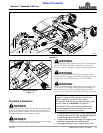
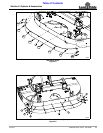
Refer to Figure 2-5 on page 17:
326-458A RCD REAR GUARD
This RCD Rear Extended Metal Guard is offset to provide
a better flow of air under the cutter resulting in a more
evenly discharge of cut material.
1. Attach rear deflector brackets (#2) to rear band
deflector (#3) with 1/2"-13 x 1" GR5 cap screws (#5)
and hex whiz nuts (#7). Draw nuts up snug.
2. Attach rear band deflector (#3) to deck rear with
1/2"-13 x 3 1/2" GR5 carriage bolts (#6), deflector
spacer (#1), and hex whiz nuts (#7). Draw nuts up
snug, do not tighten.
3. Attach rear deflector brackets (#2) to deck rear with 1/
2"-13 x 1" GR5 carriage bolts (#4) and hex whiz nuts
(#7). Draw nuts up snug, do not tighten.
4. Tighten all hex whiz nuts (#7) to the correct torque.