


16
Section 2: Operating Instructions
OS1548 and OS1572 Overseeder (S/N 166724+) 308-303M
2-16/09
Land Pride
Table of Contents
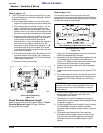
How the Seeder Works
The following is a brief description of how your
Overseeder works.
The power to drive the seed cups comes from the gauge
wheels or rear roller turning against the ground while
traveling. Power is then transmitted through roller chains
to the seed cups. Seed is metered out of the cups at a
rate proportional to the distance driven. This ensures
that the rate applied in pounds per 1000 square feet or
pounds per acre remains constant as ground speed is
varied.
Cup metering speed can be adjusted to either a high or
low range by changing the speed change sprocket. Also,
the rate seed falls through the seed cups is adjustable
using the seed rate adjustment lever located at the back
of the seeder.
Metered seed is broadcast onto the ground surface and
into the slits made by the rotor knives. Seeds drops in
front of the rear roller to allow the roller to firm the soil
around the seeds.
Parking
The following steps should be done when preparing to
store the Overseeder or unhitching it from the tractor.
See also Storage under the “Maintenance and
Lubrication” section on Page 31 for additional
information on long term storage of your Overseeder.
1. Park the Overseeder on a level, solid area.
2. Shut off tractor engine and engage parking brake.
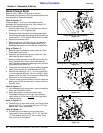
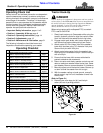
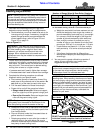
3. Refer to Figure 2-2. Place rear roller stop pin (#1)
and hairpin cotter (#2) in parking position.
4. Unhitch from tractor.
Rear Roller Stop Pin in Parking Position
Figure 2-2
14669
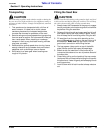
General Notes for Field Operations
Before proceeding with the first time set-up or before
making any adjustments mentioned in this section, make
every effort to obtain and hitch a tractor to the
Overseeder.
1. This Overseeder can be transported with a full box of
seeds. It is best not to do this unless necessary
because the increased weight does increase the
chances for problems on the road.
2. Do not exceed 20 miles per hour when transporting.
3. Calibrate your seeder sprocket speed and seed cup
rate adjustment lever based on type of seed you are
using. Calibration information is located on the inside
of your box lid or on page 18.
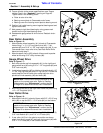
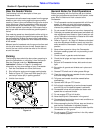
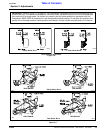
4. Refer to Figure 3-1 on page 18. Make sure the feed
cup door adjustment handle on each cup is set the
same across the Overseeder. Usually in the highest
position.
5. Never allow anyone to ride on the Overseeder.
6. Maximum seeding speed will vary according to soil
conditions.
7. Check oil level in gearbox and chaincase.
8. Check that all plugs and caps have been replaced
properly.
9. Be sure all Overseeder knives, bolts and nuts are
tight.
10. Be certain all guards and shields are in place and
secure.
11. Grease PTO shaft and all other grease fittings.
12. Clear the area to be over-seeded of rocks, branches
and other foreign objects.
13. Tall grass and weeds should be mowed before
overseeding.
14. Operate with 540 rpm PTO tractor.
15. At first begin overseeding at a slow forward speed
and shift up until the desired speed is achieved.
16. Overseeder knives will cut better at a faster rotor
speed than at reduced throttle.
17. Do not engage PTO at full throttle.
18. Never back up with Overseeder in the ground.
19. Overseeding should not be done in wet conditions as
soil will stick to the knives.
20. After overseeding the first 50 feet, stop and check to
see that the Overseeder is adjusted properly.
21. Do not make sharp turns or attempt to back up while
Overseeder is in the ground.
22. Do not engage PTO with machine in the fully raised
or fully lowered position.