


18
Section 5: Maintenance & Lubrication
AR2596 & AR2510 Pasture Aerators 325-127M
12/09/15
Table of Contents
Introduction
Proper servicing and adjustments are key to the long life
of any implement. With careful inspection and routine
maintenance, you can avoid costly downtime and repair.
Check all bolts after using the unit for several hours to be
sure they are tight. Replace any worn, damaged, or
illegible safety labels by obtaining new labels from your
Land Pride dealer.
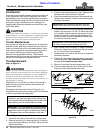
!
CAUTION
Do not alter Land Pride equipment or replace parts with other
brands. Doing so can cause equipment to perform improperly
and may lead to breakage that can cause bodily injury.
Replace parts only with genuine Land Pride parts.
Tractor Maintenance
One of the most important things you can do to prevent
hydraulic system problems is ensure that your tractor's
reservoir remains free of dirt and contamination. Use a
clean cloth to wipe hose ends before attaching them to
your tractor. Replace your tractor’s hydraulic filter
element at the prescribed intervals. These simple
maintenances will go a long way to prevent occurrence of
control valve and hydraulic cylinder problems.
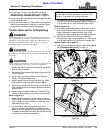
Tine Replacement
Refer to Figure 5-1:
!
WARNING
Always secure Aerator in the up position with solid supports
before servicing the underside. Never work under equipment
supported by hydraulics. Hydraulics can drop equipment if
controls are actuated or if hydraulic lines burst. Either
situation can drop the Aerator instantly even when power to
the hydraulics is shut off.
“Right-Hand” or “Left-Hand” as used in this manual is
determined by facing the direction the machine will
operate while in use.
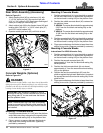
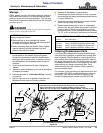
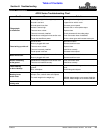
Stamped on the tines (see Arrows in Figure 5-1) is
Land Pride’s name, tine part number, and LH for left-hand
or RH for right-hand tine designation.
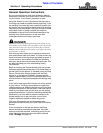
Refer to Figure 5-3 on page 19:
1. Loosen 8 nuts (#2) on one hub two or three turns.
2. Remove two bolts (#1) securing tine (#4) if working
on the Left-Hand Gang or tine (#5) if working on the
Right-Hand Gang.
IMPORTANT: Make sure right-hand tines are
mounted on the right-hand gang and left-hand tines
are mounted on the left-hand gang and that the knife
edge leads as the tine rotates about the shaft.
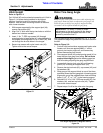
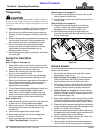
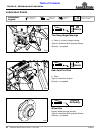
IMPORTANT: Tines are bolted on in a Spiral pattern
22.5 degrees from one blade to the blade on the next
flange over. Arrow in Figure 5-2 shows tines shifting
22.5 degrees from one hub assembly to the next.
3. Examine removed hardware for wear. Replace worn
hardware with new hardware if required.
4. Examine stamped information on the removed tine.
Replace worn tine with a new tine that has the same
stamped information.
5. Install new tine (#5 or #6) by sliding one hardened flat
washer (#3) over each 1/2"-20 x 3" GRL9 cap screw
(#1) and then inserting the two cap screws into the
thicker 5/8" plate first. After the bolt has been fully
inserted, slide a second hardened flat washer onto
the two cap screws as shown.
6. Apply Loctite 246 on the end 1/4" length of threads.
Screw hex flange lock nuts (#2) onto the cap screws
on 3 or 4 turns only. Do not tighten.
7. Repeat steps 2 to 5 until all four tines on a single hub
have been replaced.
8. Tighten all 8 hex flange lock nuts (#2) on that hub to
the correct torque. See “Additional Torque Values”
on page 24 for correct torque value.
9. Move on to the next hub and repeat steps 1 to 8.
10. Continue reworking one hub at a time until all worn
tines have been replaced with new tines.
Right-Hand & Left-Hand Tines
Figure 5-1
Spiral Pattern of Tines (Left-Hand Gang Shown)
Figure 5-2
IMPORTANT: Bolt installation direction is critical.
Always insert bolts into the thicker 5/8" plate first.
IMPORTANT: Loctite 246 should be applied to the
cap screw threads before installing lock nuts.
Right-Hand Tine
Pt. No. 820-408C
27730A
Left-Hand Tine
Pt. No. 820-407C
Knife Edge
Knife Edge
30071
Section 5: Maintenance & Lubrication