


15
Section 4: Operating Procedures
12/09/15
AR2596 & AR2510 Pasture Aerators 325-127M
Table of Contents
• All nuts, bolts, screws, and fasteners should be
checked daily for tightness. Refer to the “Torque
Values Chart for Common Bolt Sizes” on page 24.
• Do not use to tear up asphalt or for anything other than
to fracture/aerate soil.
• Do not alter the Aerator in a way which will adversely
affect its performance or reliability or use the Aerator
for a purpose for which it was not designed.
Tractor Hook-Up For Transporting
!
DANGER
A Crushing Hazard exists when hooking-up equipment to a
tractor. Do not allow anyone to stand between tractor and
implement while backing-up to implement. Do not operate
hydraulic 3-point lift controls while someone is directly
behind the tractor or near the implement.
!
CAUTION
Always make sure the hitch pin is secured with a keeper clip.
Not doing so can result in the unit coming unhitched and out
of control.
!
CAUTION
Always engage parking brake, shut off tractor, and remove key
before dismounting from tractor to hook-up equipment.
1. Adjust jack stand to the correct height for the hitch to
receive tractor drawbar.
2. Back tractor until drawbar hitch hole(s) align with Cat.
IV hitch hole(s).
3. Place tractor in park or set park brake, shut off
tractor, and remove switch key.
4. Attach Aerator hitch to tractor with hitch pin. Make
sure hitch pin is secured with hitch pin keeper.
5. Remove jack stand from near the hitch and store on
stob located on top of the tongue behind the manual
storage tube.
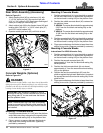
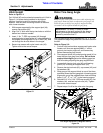
6. Attach Aerator cylinder hoses and if included, Drag
Harrow cylinder hoses to the tractor duplex outlets.
Refer to Figure 4-1:
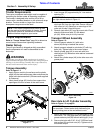
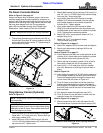
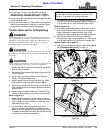
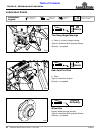
7. Raise Aerator frame fully up with tractor hydraulic
control lever. If installed, remove transport lock (#2)
from cylinder rod (#1) and store on plate (#4) with
wire retaining pin (#3).
8. Air in hydraulic lines can create erratic lifting
behavior. Retract and extend lift cylinder several
times to remove trapped air from the hydraulic lines.
If needed, bleed hydraulic lines at the cylinder fittings
to remove any remaining trapped air.
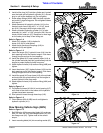
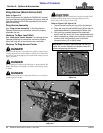
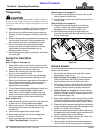
9. Raise Aerator frame fully up. Remove transport
lock (#2) from the rear storage plate (#4) and attach
it to cylinder rod (#1) with wire retaining pin (#3).
Refer to Figure 4-2:
10. If included, raise Drag Harrow Carrier fully up and
down several times to eliminate air in its hydraulic
lines. If necessary, bleed hydraulic lines at the
cylinder fittings to remove any remaining trapped air.
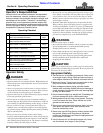
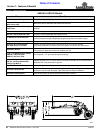
11. Raise Drag Harrow Carrier fully up. Remove
transport lock (#3) from storage pins (#1) and attach
it to cylinder rod pins (#2) with hairpin cotters (#4).
Refer to Figure 2-6 on page 12:
12. Attach Drag Harrow to transport frame. See “Hook-
up To Drag Harrow Carrier” on page 12.
Pull Type Transport Lock
Figure 4-1
Drag Harrow Transport Bar Placement
Figure 4-2
NOTE: The Aerator cylinder has an orifice installed
to slow down cylinder movement. See item 12 in
Figure 1-3 on page 9 for location of orifice.
30074
30073