


16
Section 4: Operating Procedures
AR2596 & AR2510 Pasture Aerators 325-127M
12/09/15
Table of Contents
Transporting
!
CAUTION
When traveling on public roads whether at night or during the
day, use accessory light and devices for adequate warning to
operators of other vehicles. Comply with all federal, state, and
local laws.
1. When traveling on roadways, transport in such a way
that faster moving vehicles may pass you safely.
2. Do not lower unit while transporting on pavement,
blacktop, or road. Damage to unit and/or road may
occur.
3. Select a safe ground travel speed when transporting
from one area to another. Never exceed the tire
manufacture’s maximum rated speed of 20 mph.
4. Be sure to reduce tractor ground speed when
turning; and, leave enough clearance so that the
Aerator does not contact obstacles such as
buildings, trees, or fences.
5. When traveling over rough or hilly terrain, shift tractor
to a lower gear.
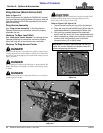
Set-Up For Field Work
Refer to
Refer to Figure 4-1 on page 15:
1. Raise Aerator fully up with tractor hydraulic control
lever, place tractor in park or set the park brake, shut
tractor engine off, and remove switch key.
2. Remove wire retaining pin (#2) and transport
lock (#1) from cylinder rod (#3).
3. Place transport lock (#1) on the rear axle storage
plate (#4) and secure with wire retaining pin (#2).
4. Return to the tractor and lower Aerator tines down to
their preferred working depth. Do not lower Drag
Harrow Carrier while making depth and angle
adjustments to the Aerator.
5. Travel forward while making adjustments to the tine
depth until the preferred depth is determined.
6. Once the tine working depth is determined, stop
tractor, place tractor in park or set the park brake,
shut tractor engine off, and remove switch key.
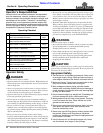
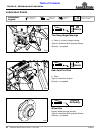
Refer to Figure 4-3:
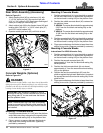
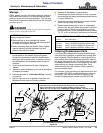
7. Determine which cylinder stops (#2) it will take to fill
cylinder rod (#1) at the predetermined depth.
8. Return to the tractor, raise Aerator up, and then add
the determined number of cylinder stops to the
cylinder rod.
9. Lower Aerator against the cylinder stops.
10. Store remaining stops (#3) on the storage plate
shown in Figure 4-3.
11. Adjust rotor tine angle per instructions under
“Rotor Tine Gang Angle” on page 13.
Refer to Figure 2-6 on page 12:
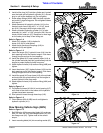
12. If included, raise Drag Harrow Carrier fully up with
tractor hydraulic control lever.
13. Unhook Drag Harrow hooks (#4) from Drag Harrow
Carrier frame.
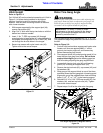
Refer to Figure 4-2 on page 15:
14. Remove Drag Harrow transport lock (#3) from
cylinder rod pins (#2). Attach transport lock to
storage pins (#1) with hairpin cotters (#4).
15. With Drag Harrow hanging straight down, pull
forward in the field while lowering the Drag Harrow
Carrier frame down.
Cylinder Stops
Figure 4-3
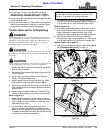
Unhook Aerator
The following steps should be done when un-hooking the
Aerator from the tractor:
1. Park tractor with Aerator on a solid level surface.
Raise Aerator tines fully up.
2. Refer to Figure 2-6 on page 12: If included, hook
Drag Harrow hooks (#4) to Drag Harrow Carrier
frame and then lower carrier frame fully down.
3. Place tractor in park or set park brake, shut tractor
off, and remove switch key. Chock in-front-of and
in-back-of Aerator wheels to prevent movement.
4. Refer to Figure 4-1 on page 15: Remove Aerator
transport lock from rear axle storage plate (#4) and
attach it to cylinder rod (#3). Secure transport lock
with wire retaining pin (#2).
5. Move tractor hydraulic control lever(s) back and forth
to allow the cylinder to come against the transport
lock and to release pressure in the hydraulic hoses.
6. Disconnect quick release couplings from the tractor’s
duplex outlets and store hoses with couplings on the
Aerator in a location off the ground.
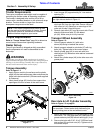
7. Attach jack stand to stob near the hitch. Make sure
the detent pin is fully inserted. Adjust jack stand to lift
the hitch weight off the tractor drawbar.
8. Remove hitch pin keeper and hitch pin. Store hitch
pin and keeper in a safe location.
9. Be sure hoses are disconnected and implement is
clear of tractor. Drive tractor away from implement.
30084