


11
Section 2: Options & Accessories
12/09/15
AR2596 & AR2510 Pasture Aerators 325-127M
Table of Contents
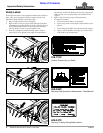
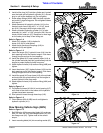
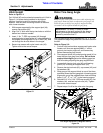
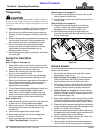
3. Attach SMV bracket (#3) to back bar of lift frame (#1)
with 1/2"-13 x 2" x 3" GR5 U-bolt (#13) and hex flange
lock nuts (#6). Torque nuts tight.
4. Apply teflon tape to the 3/8" threads of straight
adapter (#15) and screw adapter into the cylinder
port located closest to the rod end of hydraulic
cylinder (#14). Tighten adapter.
5. Apply teflon tape to the 3/8" threads of elbow
fitting (#16) and screw elbow into the cylinder port
located closest to the base end of hydraulic cylinder
(#14). Tighten elbow oriented as shown.
6. Attach 3/8" x 201" long hydraulic hoses (#17) to
adapter fitting (#15).
7. Attach 3/8" x 217" long hydraulic hoses
(#18) to elbow fitting (#16).
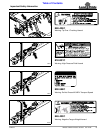
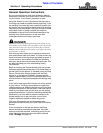
Refer to Figure 2-4 on page 11:
8. Attach 3/4" adapters (#23) to hose ends and tighten.
9. Attach quick disconnect couplings (#24) to the
adapters tighten.
Refer to Figure 2-3 on page 11:
10. Orient hoses so that they are on the right side of the
cylinder (#14). Attach base end of hydraulic cylinder
to the Aerator frame with cylinder pin (#2).
11. Attach rod end of hydraulic cylinder (#14) to the lift
frame with cylinder pin (#2) & flat washer (#8).
12. Insert 3/16" x 1 3/4" cotter pins (#9) into cylinder
pins (#2). Bend one or both legs to secure them in
place.
Refer to Figure 2-4:
13. Insert hydraulic hoses (#17 & #18) into the open end
of the tongue located at the back of the main frame.
Push both hoses together through the tongue and
out the front (#22) as shown in Figure 2-4.
14. Pivot lift frame up and down to find the maximum
distance between hydraulic cylinder and opening
end of tongue. Pull hydraulic hoses (#17 & #18) out of
end (#22) until most of the slack in the hoses have
been removed.
15. Run hydraulic hoses through hose loop (#21).
16. Pivot lift frame fully up and down to make sure the
hydraulic hoses are not hanging up.
Refer to Figure 2-3 on page 11:
17. Attach transport bar (#4) to the left side of the lift
frame and secure in place with hairpin cotters (#10).
Hydraulic Hose Routing & Quick Coupling Assembly
Figure 2-4
30066
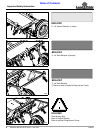
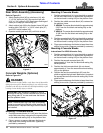
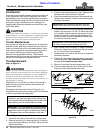
Tie Down Concrete Blocks
Refer to Figure 2-2 on page 10:
Always use heavy duty tie-downs, straps, and corner
protector pads (strap & pads supplied by customer) to
secure Land Pride concrete blocks from bouncing on the
platform while traveling over rough terrain and on a road
that may have bumps and ruts. Corner protector
pads (#5) are available through Land Pride’s Parts
Department. Order 2 each of Part No. 816-646C.
1. Attach strap to handle “A” on the left side.
2. Thread strap through corner protector pad (#5) on
the left side, lifting rods “B”, corner protector pad (#5)
on the right side and to handle “C”. Tighten strap to
secure blocks in place.
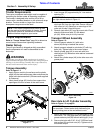
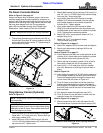
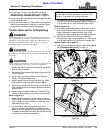
Drag Harrow Carrier Assembly
Figure 2-3
Drag Harrow Carrier (Optional)
Refer to Figure 2-3:
1. Orient lift frame (#1) as shown and pin to Aerator
frame with 1" x 6" hitch pins (#11). Secure hitch pin
with hairpin cotters (#12).
2. Attach SMV sign (#19) to SMV bracket (#3) with
1/4"-20 x 5/8" round head screws (#5) and hex flange
top lock nuts (#7). Tighten nuts.
NOTE: Weights can bounce out if bump is severe.
30065
NOTE: Drag Harrow Carrier and Drag Harrow are
sold separately.
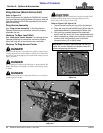
IMPORTANT: Make sure the Aerator is properly
supported so that it won’t flip over backwards during
installation of the lift frame. One method would be to
hitch the tongue to a tractor.