


ASSEMBLY
OM 0408SB1174-A
15
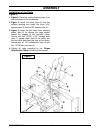
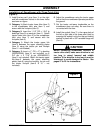
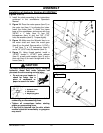
Installation of Snowblower with Three Point Hitch
(Figure 4)
1. Install the two cat.1 pins (item 1) on the right
and left snowblower hitches in the lower holes
as shown on figure.
2. Category 1: Attach tractor lower links (item 2)
to the snowblower hitch pins (item 1) and
secure with the linchpins (item 3).
3. Category 2: Insert the 1 1/8" OD x 1 3/4" lg
bushings (item 9) on each pin (item 1). Attach
tractor lower links (item 2) to the snowblower
hitch pins (item 1) and secure with the
linchpins (item 3).
4. Category 1: Attach the tractor upper link
(item 4) between the upper attaching plates
(item 6) using the tractor pin and linchpin
(item 5 – not included).
5. Category 2: Insert a 1" OD x 2" lg bushing
(5RD4600056) (item 10, not included) on a
3/4" dia. x 5 7/16" lg pin (5RD4600051)
(item 5- not included). Attach the tractor upper
link (item 4) between the upper attaching
plates (item 6) using the bushing, the pin and
the tractor linchpin (item 5 & 10 – not
included).
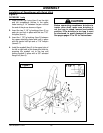
6. Adjust the snowblower using the tractor upper
link so that the snowblower operates parallel to
the ground.
7. Set the tractor anti-sway turnbuckles so the
snowblower does not sway. Be sure there is
no contact with the tires.
8. Install the eyebolt (item 7) in the upper hole of
the left or right side of the three point hitch by
screwing the eyebolt nut to the top and locking
eyebolt in place with a 3/8" serrated flange nut
(item 8).
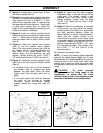
CAUTION
Before connecting snowblower driveline to
tractor drive shaft, make sure driveline is not
too long in raised, lowered and middle
position. If the driveline is too long it must be
shortened, to avoid damaged to tractor. See
pages 27 to 29 for instructions.
Figure 4