


Operation 9
32695 (Rev. 11/17/2006)
mately 1/4" lower than front to prevent belt from rub-
bing on mower.)
Dimension “B” is set by adjusting optional casters or lift
chains.
Dimension “A” is set by raising or lowering channel
arms in push bars.
IMPORTANT
■ Any adjustment to either dimension “A” or “B”
will require checking the other adjustment.
Set desired cutting height with casters or lift chains
then adjust for dimension “A”.
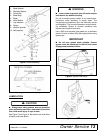
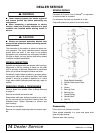
Check attitude by placing a straight edge along outside
edge of mower as shown in Figure 1. Measure from
bottom of straight edge to ground. The measurement at
dimension “B” should be level with or approximately
1/2" lower than the rear. The measurement at dimen-
sion “A” should never be lower than the one at dimen-
sion “B” (except when using a leaf mulcher or with
some tractor tire configurations, it may be necessary to
adjust rear of mower approximately 1/4" lower than
front to prevent belt from rubbing on mower.)
To determine cutting height, it is necessary to subtract
the distance the blade is below mower from the mea-
surement at dimension “B”. Subtract 4-7/8" from
dimension “B”; the remainder is the cutting height.
Be sure mower is level side to side using these mea-
surements. If it is not, check to be sure casters are set
in same hole, and that channel arms and push bars are
set in same hole on each side. Minor adjustments can
be made by using slots in rear lift bracket for adjust-
ments.
When making cutting height or attitude changes, be
sure to check belt alignment. (Refer to Belt Alignment
in Assembly section on page 23.)
IMPORTANT
■ Improper belt alignment or tension can cause
premature belt failure.
Side Skid Adjustment
With cutting height established, adjust side skids at
least 1/2" above ground level. Properly adjusted side
skids are designed to carry mower over uneven ground
and minimize scalping. Never adjust side skids to be in
constant contact with ground.
■ Allow no children or unqualified persons to
operate this equipment.
■ Do not operate mower in vicinity of other per-
sons.
■ Do not allow riders on tractor or mower.
PRE-OPERATION CHECK LIST
___ Check to ensure blades are sharp and secure
and cutting edge is positioned in the direction of
blade rotation (counter-clockwise as viewed from
top of mower).
___ Always operate tractor PTO at 1000 rpm maxi-
mum when mowing.
___ Check to make sure all safety shielding is prop-
erly installed and is in good condition. Be sure
discharge chute or side shield is installed.
___ Check cutting height adjustment.
___ Clear area to be mowed of debris that could be
picked up and thrown by mower.
___ Place tractor transmission in neutral and be sure
PTO is disengaged before attempting to start
tractor engine.
___ Make sure all critical tractor adjustments such as
brake and clutch pedal travel, etc., are set to trac-
tor manufacturer’s specifications.
STARTING & STOPPING MOWER
Power for operating the mower is supplied by tractor
power take off (PTO). Refer to your tractor manual for
PTO operating instruction.
■ Do not exceed PTO speed of 1000 rpm maxi-
mum.
■ Stop mower and tractor immediately upon
striking an obstructions. Inspect mower and repair
any damage before resuming operation.
Should mower become plugged, causing belt to slip
over two seconds, raise mower just enough to clear
plug and continue running for at least two minutes,
allowing pulleys to cool. Stopping the mower with belt
in contact with a very hot pulley will bake and ruin belt.
Do not raise mower higher than necessary, to reduce
the risk of thrown objects.
Commencing Mowing
When engaging PTO, the engine rpm should always be
low. Once engaged and ready to start mowing,
A WARNING
A WARNING
A CAUTION