


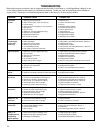

28
Section 5: Maintenance
WARNING Before inspecting, cleaning or servicing the unit, shut off engine, wait for all parts to come to a
complete stop, disconnect spark plug wire and move wire away from spark plug. Remove ignition key on elec-
tric start models. Failure to follow these instructions can result in serious personal injury or
property damage.
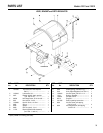
FORWARD DRIVE BELT
REMOVAL AND INSTALLATION
The forward drive belt (I, Figure 5-11) is
driven by the engine drive pulley (P).
When the Forward Clutch is engaged, it
puts tension on the forward idler pulley
(R) which tightens the belt between the
engine drive pulley and the transmission
drive pulley (large pulley located below
the engine drive pulley). The transmis-
sion drive pulley then turns the main drive
shaft inside the transmission.
A. Removing the Forward Drive Belt
1. Stop the engine, allow it to cool and
disconnect the spark plug wire before
working near the belts. Also remove the
ignition key on electric start models.
2. First remove the reverse drive belt (J,
Figure 5-11) by following the “Removing
the Reverse Drive Belt” instructions in
this Section.
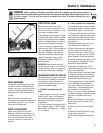
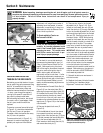
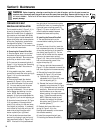
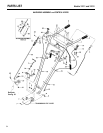
3. Using needle-nose pliers, carefully
unhook the forward idler return spring (A,
Figure 5-14) from the reverse idler
bracket assembly.
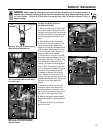
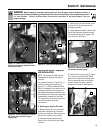
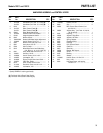
4. Remove the forward idler bracket
assembly (B, Figure 5-15) by removing
the nut and lockwasher from the screw
(C). You may need to push the screw
part way through the bracket while
removing the assembly. Do not remove
the flat washer and bushing from the
screw. NOTE: Before removing the
assembly, lift the forward adjustable link
(M, Figure 5-15) off the link adjusting pin.
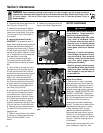
5. Move the forward drive belt (D, Figure
5-16) completely off the engine drive
pulley (E) by moving it to the rear (away
from engine) of the pulley. If necessary,
work the belt off the pulley with your left
hand while pulling the engine recoil
starter rope with your right hand.
6. Push the belt downward and then
remove it by slipping it over the front of
the transmission pulley (F, Figure 5-16).
NOTE: If the belt will not pass between
the right side of the transmission pulley
and the tiller frame, try loosening the two
right side frame mounting screws (G,
Figure 5-17) two or three full turns. This
should create the needed clearance
between the frame and the pulley.
B. Installing the Forward Drive Belt
1. The reverse drive belt must be
removed before installing the forward
drive belt.
2. From the front of the tiller, insert the
belt in between the bottom of the engine
drive pulley and the top of the transmis-
sion pulley (see Figure 5-16). Put the
bottom half of the belt into the rearmost
groove in the transmission pulley (I,
Figure 5-18). Now put the top half of the
belt into the rearmost groove of the
engine drive pulley (H).
3. If the two right side frame screws (G,
Figure 5-17) were loosened to remove the
belt, then retighten both screws securely.
4. Reinstall the forward idler bracket
assembly (B, Figure 5-15) as follows:
a). Place the slot in the forward
adjustable link (K, Figure 5-19) over
the link adjusting pin (L).
b). Reinstall the forward idler bracket
assembly using the screw (C, Figure
5-15), lockwasher and nut removed
previously. Be sure that the bushing
and flat washer are on the screw
before inserting it through the bracket
arms. Tighten the screw securely.
NOTE: Check that the belt is posi-
tioned to the inside of the forward
idler pulley (see R, Figure 5-11) and
both belt guides (T).
5. Reattach the forward idler return
spring (A, Figure 5-14) to the
bushing/screw assembly on the reverse
idler bracket assembly.
6. Install the reverse drive belt (see
“B. Installing the Reverse Drive Belt”).
Figure 5-14: Unhook forward idler return
spring.
A
Figure 5-15: Remove forward idler bracket
assembly.
Figure 5-16: Remove forward drive belt.
B
M
D
E
F
C