


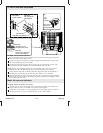
Prepare el subpiso (cont.)
Verifique que el subpiso esté a nivel. Si el subpiso no está nivelado, continúe en la
subsección ″Nivele el subpiso″ a continuación.
Nivele el subpiso (opcional)
¡IMPORTANTE! Si va a instalar este producto utilizando una capa de cemento
mortero, no nivele el subpiso en este momento. Continúe en la sección ″Instale las
tuberías de plomería″ en esta guía de instalación.
AVISO: Se requiere cemento mortero para nivelar un subpiso desparejo. No utilice
yeso, cemento de yeso o pasta para paneles de yeso para esta aplicación, puesto que
estos materiales no proporcionan el soporte estructural adecuado.
Aplique una capa uniforme de cemento mortero en el subpiso donde se colocarán
los soportes de la bañera.
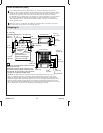
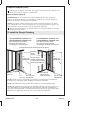
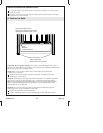
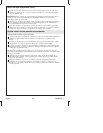
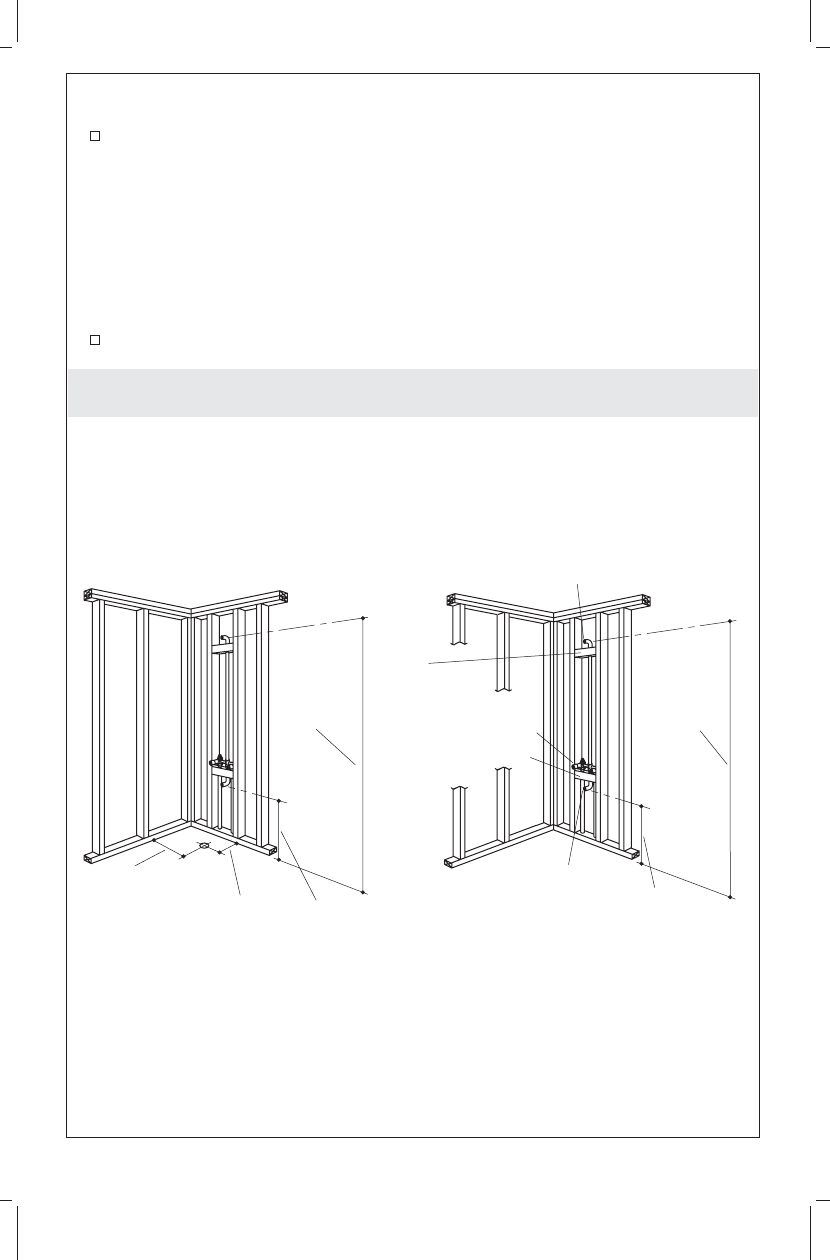
3. Install the Rough Plumbing
NOTE: Provide access to all plumbing connections to simplify future maintenance.
Include access at the back of the plumbing wall whenever possible.
NOTE: The dimension shown for the shower elbow is a recommended height.
NOTE: The plumbing end wall cannot be installed with the spout pipe in place. Use
of an elbow fitting is recommended. Once the plumbing end wall is installed, the
spout pipe can be threaded or sweated into the elbow. Choose the appropriate elbow
fitting for your application based on your access needs. See illustration.
Blocking/Arrêt/Bloque
Shower Elbow/Coude de douche/Codo de ducha
with "Through the Floor" Drain
avec drain "A travers le sol"
con desagüe "a través del piso"
with "Above the Floor" Drain
avec drain "Au-dessus du sol"
con desagüe "arriba del nivel del piso"
Blocking
Arrêt
Bloque
Supply Valves
Valves d'alimentation
Válvulas de suministro
77"
(195.6 cm)
Min/Min/Mín
25" (63.5 cm)
Min/Min/Mín
Spout Elbow
Coude du bec
Codo del surtidor
15-1/4"
(38.7 cm)
10"
(25.4 cm)
23" (58.4 cm)
Min/Min/Mín
75"
(190.5 cm)
Min/Min/Mín
7114 Series/Séries 7114/Serie 7114
7124 Series/Séries 7124/Serie 7124
7114 Series/Séries 7114/Serie 7114
7124 Series/Séries 7124/Serie 7124
1065823-2-C 16 Sterling