


Construya la estructura de postes de madera (cont.)
Asegúrese de que la fibra u otro tipo de aislamiento suave no caiga en el canal de
agua. Cubra o selle todo el material suelto. Si no lo hace podría causar la
absorción del agua desde el canal de agua hacia el aislamiento, lo que podría
producir fugas o moho. Asegúrese de que los canales estén libres de suciedad
después de la instalación.
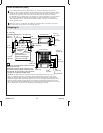
Para bañeras con desagüe arriba del nivel del piso
Asegúrese de que la tubería de desagüe pueda pasar a través de la pared y se
cumplan los requisitos de soporte de carga de la pared. Modifique la estructura o
eleve el subpiso según sea necesario para obtener espacio.
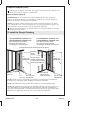
Construya una estructura de postes de madera de 2x4 para su instalación en
particular siguiendo la sección del diagrama de instalación.
Asegúrese de que los postes de la estructura estén a plomoyaescuadraconuna
tolerancia de 1/8″ (3 mm). Si no se alcanzan estas tolerancias, será necesario
utilizar cuñas.
Si es posible, construya un panel de acceso en la pared lateral que tiene las
conexiones de plomería para simplificar el mantenimiento futuro de todas las
conexiones de plomería.
2. Prepare the Subfloor
NOTICE: The bath supports must rest directly on a level subfloor.
NOTICE: Squeaking may develop if the bath is installed over a subfloor other than
plywood. In order to prevent squeaking, place a pad between the bath and the
subfloor and positioned under the bath supports. We recommend that the pad be
made of spun bonded polyester landscape fabric or spun bonded house wrap
material. Do not use roofing felt.
NOTICE: The drain line must be installed in accordance with the drain
manufacturer’s instructions. Locate the drain line and trap using the dimensions
given in the ″Roughing-In″ section.
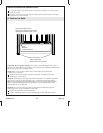
For above-the-floor drain installations, cut the hole in the floor for the drain line.
For through-the-floor drain installations, cut the hole in the floor for the drain
assembly. The drain connection should be made directly under the overflow drain.
Leave room to connect the piping.
Ensure that the apron flanges can be secured to the studs or install three 2x4
blocks just behind the apron location.
Verify the subfloor is level. If the subfloor is not level, proceed to the ″Level the
Subfloor″ subsection below.
Level the Subfloor (Optional)
IMPORTANT! If you intend to install this product using a mortar cement bed, do not
level the subfloor at this time. Proceed to the ″Install the Rough Plumbing″ section of
this installation guide.
NOTICE: Mortar cement is required to level an uneven subfloor. Do not use plaster,
gypsum cement, or drywall compound for this application, as these materials do not
provide adequate structural support.
Spread a layer of mortar cement on the subfloor where the bath supports will be
located.
1065823-2-C 14 Sterling