


CUSTOMER RESPONSIBILITIES
TRACTOR
Always observe safety rules when performing any
maintenance..
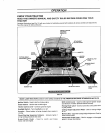
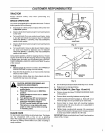
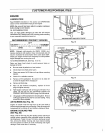
BRAKE OPERATION
Your tractor is equipped withan adjustable discbrake To check
brake operation do the following:
• Stoptractor on a level surface and place shift control lever
in NEUTRAL position.
e Depress brake_clutch pedal enough to latch parking brake
in 2nd notch.
e Try to push tractor, lf you are unable to push tractor, brake
is too tight and should be loosened (see TO ADJUST
TRACTOR BRAKE in SERVICE AND ADJUSTMENTS
section of this manual.
e Depress brake-clutch pedal enough to latch parking brake
in 4th notch_
e Try to push tractor Ifyou are able to push tractor, brake is
too loose and should be tightened (see TO ADJUST
TRACTOR BRAKE in SERVICE AND ADJUSTMENTS
section of this manual.,
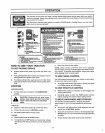
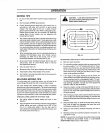
During tractor operation, check for stopping distance..If tractor
requires more than six (6) feet stopping distance at high speed
in highestgear, the brake must be adjusted (see to ADJUST
TRACTOR BRAKE in SERVICE AND ADJUSTMENTS section
of this manual),
e Maintain proper air pressure in all tires,,(See"PRODUCT
SPECIFICATIONS" on page 3 of this manual),
e Keep tires free ofgasoline, oil, or insect controlchemicals
which can harm rubber.
o
Avoid stumps, stones, deep ruts, sharp objects and other
hazards that may cause tire damage
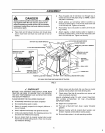
CAUTION: BEFORE PERFORMING ANY
SERVICE OR ADJUSTMENTS
• Fully depress brakeoctutch pedal and set
parking brake.,
e Place shift control lever in NEUTRAL
position,
• Place attachment clutch lever in DISEN-
GAGED position,,
e Turn ignition key OFF and remove key°
• Make sure the blades and all movtng
parts have completely stopped,
• DO NOT handle blades with bare hands.
Wear gloves or wrap blade with news-
paper or other material while removing
or Installing blade.
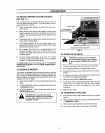
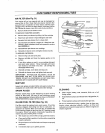
BLADE CARE
For best results mower blades must be kept sharp The blades
can be sharpened with a file or on a grinding
wheel. We suggest they be sharpened or replaced after every
25 hours or mowing, Check blades more often if mowing in
sandy conditions.,
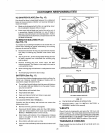
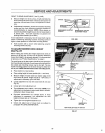
BLADE
MOUNTING
SCREWS
SHARPEDGE
Fig, 13
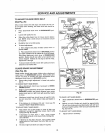
BENTTIPEDGE
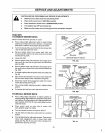
BLADE
SPRING
WASHERS
GRADE 5 Q
BOLT SHOWN MOUNTING
SCREW
Fig° 14
• Do not attemptto sharpen blades while they areon mower,
e Replace bent or damagedbladeso
BLADE REMOVAL (See Figs. 13 and 14)
• Remove mowerdeck (seeTO REMOVE MOWER DECK
in this section),,
• Remove blade mounting hardware securing blade
• Install new blade with bent tip edges up.. Blade wiUnot cut
if bent tip edges are not up toward top of mower deck,
e Secure biade to mower deck with mounting hardware
removed earlier_ Be sure all parts are re-assembled in
proper order as shown.
e Tighten blade mounting bolts securely, "Werecommend
using a10 inch wrench ortorque wrench, Ifatorque wrench
is used, torque bolts to between 30 -35 ft lbs).
IMPORTANT: Blade mounting bolts are Grade 5heat treated as
shown in Fig° 14 inset.
!9