


16
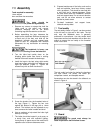
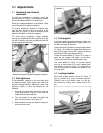
12. Loosen the pivot lock handle and lower the
motor using the tension handle. Re-tighten the
pivot lock handle.
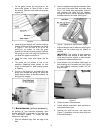
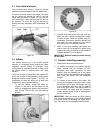
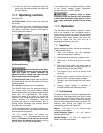
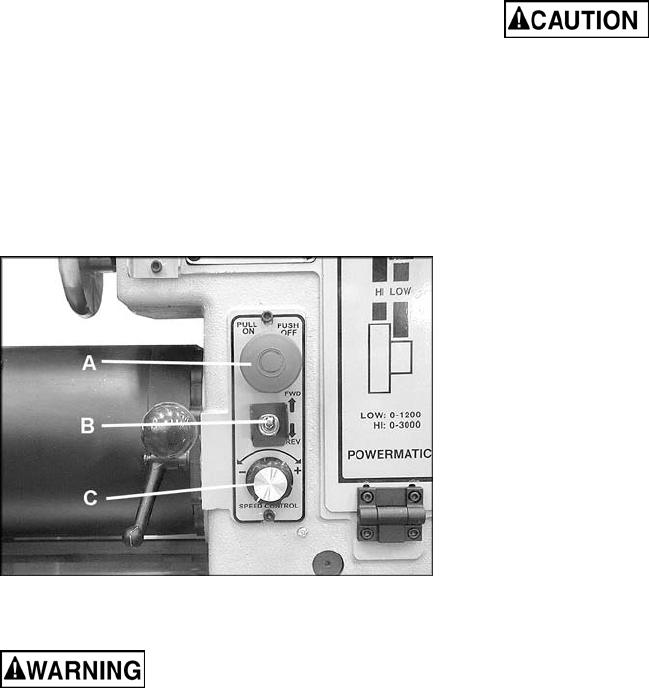
10.0 Operating controls
See Figure 24.
(A) On/Off Button: Push in to stop the Lathe; pull
out to start.
NOTE: If there is a power outage while operating
the Lathe, the Lathe will not automatically restart
once power is restored. Cycle the on/off switch in
order to restart the machine.
Figure 24
(B) Forward/Reverse
When turning with a face plate,
make sure both set screws on the face plate are
tight (see Figure 21) before reversing the
spindle. Failure to comply may cause the face
plate to spin loose from the spindle.
(C) Speed Control Dial: Always start the Lathe at
the lowest speed, with the dial rotated all the way
counterclockwise.
A.C. Inverter (mounted to rear of headstock)
The PM2020 Lathe uses the latest technology in
A.C. inverter drives to provide infinitely variable
spindle speeds within the specified ranges (shown
under sect. 5.0, Specifications). The inverter
controls the speed of the motor by varying the
frequency of the voltage supplied to the motor. The
inverter provides an acceleration ramp that
eliminates the shock of normal starting. Also, a
braking feature eliminates long coasting periods
after the Lathe is turned off.
The 2 horsepower motor is specially designed for
use with inverter drives, and is balanced to reduce
noise and minimize vibration.
The A.C. Inverter does not require any
programming – it is pre-programmed from the
factory. The buttons on the face of the inverter
should never be pushed at any time. Use only
the controls on the front of the headstock.
If you suspect there is a problem with the inverter
or the inverter settings, contact Powermatic
technical service at 1-800-274-6848.
A lightning strike or power
surge may cause the inverter to fail. When lathe
is not in use, disconnect power plug, or have a
3- or 4-pole disconnect installed on the power
side.
11.0 Operation
The information which follows is general in nature
and is not intended to be a complete course in
wood turning. Nothing can replace the knowledge
gained by talking with experienced woodturners or
consulting books, trade articles, and such like.
Above all, simple trial and error will aid in
developing proficiency in the craft.
11.1 Inspection
Before operating the lathe, check that everything is
in proper working order:
1. Level your machine; use the adjustable
levelers to help reduce vibration.
2. Check bearings; adjust only if endplay exists.
3. Check belt; it should be snug but not overly
tight.
4. Bed ways; keep clean, use steel wool to
remove any rust spots, and apply paste wax to
prevent buildup of rust and finishes.
5. Tool support; use a mill file to remove nicks
and dings.
6. Spindle tapers; should be clean and free of
dust and chips for proper seating of tapers.
7. Tailstock; clean and lubricate ram and locking
device.
8. Lighting; proper lighting is essential to
eliminate shadows and reduce eye strain.
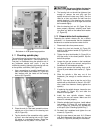
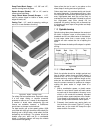
11.2 Turning tools
If possible, select only fine quality, high-speed steel
turning tools. High-speed steel tools hold an edge
and last longer than ordinary carbon steel. As one
becomes proficient in turning, a variety of specialty
tools for specific applications may be acquired. The
following tools provide the basics for most
woodturning projects (see Figure 25):
Skews – 1-1/2" and 1" or 1-1/4", used to make
finishing cuts and details.
Large Roughing Gouge – 1" to 1-1/4", used to
eliminate waste wood.
Spindle Gouges – 1/4", 3/8", 1/2", used to turn
beads, coves and other details.