


Lining Up with the Celestial Pole
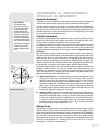
Objects in the sky appear to revolve around the celestial pole. (Actually, celestial
objects are essentially
“fixed.” Their apparent motion is caused by the Earth’s rotation).
During any 24 hour period, stars make one complete revolution about the pole, mak-
ing concentr
ic circles with the pole at the center. By lining up the telescope’s polar axis
with the North Celestial Pole (or for observers located in Earth’s Southern
Hemisphere, with the South Celestial Pole), astronomical objects may be followed, or
tracked, simply by moving the telescope about one axis, the polar axis. This tracking
may be accomplished automatically with the
RCX400 electric motor drive.
If the telescope is reasonab
ly well aligned with the pole, very little use of the tele-
scope’s Declination slow motion control is necessary. Virtually all of the required tele-
scope tracking will be in Right Ascension. (If the telescope were perfectly aligned with
the pole, no Declination tracking of celestial objects would be required.) For the pur-
poses of casual telescopic observations, lining up the telescope’s polar axis to within
a degree or two of the pole is more than sufficient: with this level of pointing accura-
cy, the telescope’s motor drive will track accurately and keep objects in the telescop-
ic field of view for perhaps 20 to 30 minutes.
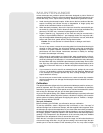
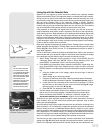
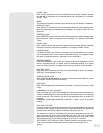
Begin polar aligning the telescope by locating Polaris. Finding Polaris is simple. Most
people recognize the “Big Dipper.” The Big Dipper has two stars that point the way to
Polaris (
Fig. 52). Once Polaris is found, it is a straightforward procedure to obtain a
rough polar alignment.
To line up with Polaris, follow the procedure described below. Refer to the instruction
sheet included with your equatorial wedge for information about attaching the wedge
to the telescope and also about using the azimuth and latitude controls.
1. Select "Setup: Telescope" from the Autostar II menus. Press ENTER. Scroll to
"Telescope: Mount" and press ENTER. Scroll to "Scope Mounting: Polar" and
press ENTER. The telescope mount is now set to the polar mode.
2. Press MODE until "Select Item: Setup" displays. Press ENTER. "Setup: Align" dis-
plays. Press ENTER. "Align: Easy" displays. Scroll to "Align: One-Star" and press
ENTER. Autostar II now prompts you to set the telescope in the polar home posi-
tion.
a. Using the bubble level of the wedge, adjust the tripod legs so that the
bubble is level.
b. Set the wedge to your observing latitude.
c. Using the Up and Down Arrow keys, rotate the telescope tube in Declination
so that the telescope’s Declination reads 90°. See
SETTING CIRCLES, page 57.
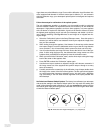
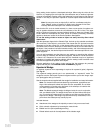
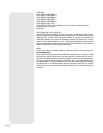
d. Loosen the R.A. lock, and rotate the fork arms to the 00 position H. A. : Move
the forks arms so that center tick mark on fork arm base (A, Fig. 53) aligns
with the tick mark on the base (B, Fig. 53).
e. Press ENTER. The telescope slews to Polaris.
f. Use the azimuth and latitude controls on the wedge to center Polaris in the
field of view. Do not use the Autostar II handbox during this process. When
Polaris is centered, press ENTER. The telescope is now polar aligned. See
AUTOSTAR II PRECISE POLAR ALIGNMENT, page 60, for more information.
At this point, your polar alignment is good enough for casual observations. There are
times, however, when you will need to have precise polar alignment, such as when
making fine astrophotographs.
Once the latitude angle of the wedge has been fixed and locked-in according to the
above procedure, it is not necessary to repeat this operation each time the telescope
is used, unless you move a considerable distance North or South from your original
obser
ving position.
(Appro
ximately 70 miles mo
v
ement in Nor
th-South obser
ving posi
-
tion is equiv
alent to 1
°
in latitude change
.)
The w
edge may be detached from the field
tr
ipod and, as long as the latitude angle setting is not altered and the field tr
ipod is le
v
-
eled, it will retain the correct latitude setting when replaced on the tr
ipod.
The first time you polar align the telescope, check the calibration of the Declination
setting circle (
Fig. 50). After performing the polar alignment procedure, center the star
P
olar
is in the telescope field.
Remo
v
e the kn
urled central hub of the Declination set-
P
olaris
Little Dipper
B
ig Dipper
Cassiopeia
Fig. 52: Locating Polaris.
Fig. 53: Align tick marks to set the
fork arms to 00 H.A. position.
Ạ
ạ
Ả
Tip:
You can check if the declina-
tion is set at true 90° in step
2c.Look through the eyepiece
and rapidly slew the optical
tube on the R.A.axis. If all the
stars rotate around the center
of the field of view, the
Declination is set at 90°. If the
stars arc out of the field of
view, slew the optical tube on
the Declination axis until you
achieve the centering effect.
59