


22
Speeds 4, 5, or 6: Enable centering of an object in the field of a low-to-moderate
po
wer eyepiece, such as the standard UltraWide 24mm.
Speeds 7 or 8: Best used for rough centering of an object in the viewfinder.
Speed 9: Mo
ves the telescope quickly from one point in the sky to another.
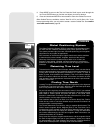
Observe the Moon
Point your telescope at the Moon (note that the Moon is not visible every night) and
practice using the Arrow keys, the digital front focus and the slew speeds to view dif-
ferent features.The Moon contains many interesting features, including craters, moun-
tain ranges, and fault lines. The best time to view the Moon is during its crescent or
half phase. Sunlight strikes the Moon at an angle during these periods and adds a
depth to the vie
w. No shadows are seen during a full Moon, making the overly bright
surface to appear flat and rather uninteresting. Consider the use of a neutral density
Moon filter when observing the Moon.See
SERIES 4000 PHOTO-VISUAL FILTERS, page
48. Not only does it cut down the Moon's bright glare, but it also enhances contrast,
providing a more dramatic image.
Astronomical Observing
Used as an astronomical instrument, your telescope has many optical and electro-
mechanical capabilities. It is in astronomical applications where the high level of opti-
cal performance is readily visible.The range of observable astronomical objects is lim-
ited only by the observer’s motivation.
To Track an Object Automatically
As the Earth rotates beneath the night sky, the stars appear to move from East to
West. The speed at which the stars move is called the sidereal rate. You can setup
your telescope to move at the sidereal rate so that it automatically tracks (follows) the
stars and other objects in the night sky. If the telescope is not tracking an astronomi-
cal object, the object will drift out of the eyepiece field of view. The tracking function
automatically keeps an object centered in the telescope’s eyepiece.
To automatically track objects, you need to learn how the Autostar II keypad operates
in order to move through its menus.You'll need to initialize and align your telescope.
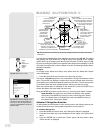
Moving Through Autostar II’s Menus
The Autostar II database is organized in levels for quick and easy navigation.
ܖ Press ENTER (2, Fig. 2) to go deeper into Autostar II's menu levels.
ܖ Press MODE (3, Fig. 2) to move back toward the top menu level.
ܖ Press the Scroll k
eys (
7,
Fig. 2
)
to move up and down through the options avail-
able for each level.
ܖ Press the Arrow keys (5, Fig. 2) to enter characters and digits.The Arrow keys are
also used to move the telescope.
ܖ Use the Number keys to enter digits.
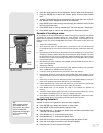
Automatic Alignment Feature
Autostar II offers four methods of altazimuth (alt/az) alignment; this section describes
how to initialize and align your telescope using
Automatic Alignment. (For a descrip-
tion of the other alt/az alignment methods, see pages 42 and 43. For information
about equatorial (polar) alignment, see
APPENDIX A, page 57.)
To prepare your telescope for Automatic Alignment:
1. Tighten the R.A. and Dec. locks (13 and 17, Fig. 1a).
2. Verify that Autostar II is properly connected to your telescope. See
TO CONNECT
AUTOSTAR II
,
page 17.
3. Flip the telescope power switch to the ON position.
The Autostar II screen is activated and a copyright message displays briefly, followed
by a short beep.Then Autostar II takes a few moments to start up the system.
Definition:
Initialization
is a proce-
dure that ensures that
Autostar II operates cor-
rectly.When you first use
Autostar II, it doesn't yet
know where the observa-
tion location site is or the
time or date of the obser-
vation session.
During the
automatic
alignment procedure, the
system calculates these
parameters automatically.
Autostar II uses this infor-
mation to precisely calcu-
late the location of celestial
objects (such as stars and
planets) and to move your
telescope correctly for vari-
ous operations.
Tip:
When multiple choices are
a
v
ailab
le within an A
utostar
II men
u option, the current
option is usually displayed
first and highlighted b
y a
r
ight pointing arro
w (>).
Note:
Press any key on the
A
utostar II handbo
x to abor
t
the GPS fix.
If abor
ted,
Autostar II then displays
"Enter Date
."
Y
ou ma
y f
ollo
w
prompts to perf
or
m a man
u-
al alt/az alignment (see
page 42) or press MODE
repeatedly until "Select
Item" displays to use the
Autostar II men
u options
.