


20
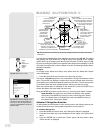
Sync On Preset men
u if
y
ou do not park
y
our telescope (this menu will reset all your
focus presets after you turn off and turn on your scope again ).
To define a preset:
1.
Point the telescope at a distant object, press FOCUS and use the Up and Down
Arrow keys to focus the telescope until the object is sharply focused as previously
e
xplained.
2. Press the Focus key again (FOCUS toggles between the Focus menu and the
Preset menu).“Focuser Preset: Go To” displays. Use a Scroll key and scroll down
the list of options until “Focuser Preset: Define Preset” displays. Press ENTER.
3. A list of presets displays.If no preset is currently assigned, “1- Unnamed” displays
(f
ollowed by 2- Unnamed, up to 9 - Unnamed).
4. Use the up and down Scroll keys to scroll through the alphabet and the right and
left Arrow keys to move to cursor right or left across the display.
5. When you have finished typing in a name and focusing the telescope, press
ENTER. That number preset is now defined.You can enter 9 names. For exam-
ple, you may enter “Joe,” “Jill,” “Deep Sky Imager” and so forth.
6. To select one of these presets, you will use the “Focuser Preset: Go To” menu.
To select a previously defined focus preset
1. Press the Focus key twice. “Focuser Preset: Go To Preset” displays. Press
ENTER to select this menu.
2. Use a Scroll key and scroll down the list of previously defined presets. When the
desired preset displays (for example, “Deep Sky Imager”), press ENTER.
Important Note: If you do not park your telescope, you will need to select
one of the presets and refocus your telescope using the Sync On menu.
See
TO SYNC ON A FOCUS PRESET below.
To sync on a focus preset
If you park your telescope, AutoStar II remembers all the focus positions you
defined as presets and you will not need this menu.
If you do not park your telescope, you will need to select just one of the presets and
refocus your telescope using the Sync On menu. Then AutoStar II will then reset all
the other presets back to the focus preset positions you previously defined.
1. Press the Focus key twice. “Focuser Preset: Go To Preset” displays. Use a Scroll
key and scroll until “Focuser Preset: Sync On Preset” displays and press ENTER
to select this menu.
2. Use a scroll key to choose one of the previously entered presets from this list (the
most likely preset you will choose will be one that accounts for your own
eyesight).
3.
Use the Up or Do
wn Arrow keys to focus the eyepiece.
4. Press ENTER. AutoStar II now “remembers” the relative focus positions of the
e
yepiece.You can now choose any preset and it will be correctly focused.
To exit the focus operation at any time:
1. Press MODE.
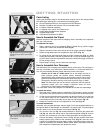
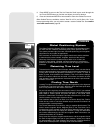
Observing by Moving the Telescope Manually
If you wish to observe a distant land object, such as a mountain top or a bird, you can
observe by merely pointing the telescope and looking through the eyepiece.
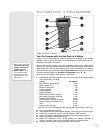
1. Loosen the telescope’s R.A. lock (
13, Fig. 1a) and Dec. lock (17, Fig. 1a).
2. Move your telescope to observe distant street signs, mountains, trees, and other
structures. Use your viewfinder to help site-in on an object.
3. Center the object in the viewfinder’s crosshairs and then in the telescope eye
piece
.
When the object is
centered in your eyepiece, remember to re-tighten the
R.A. and Dec. locks.
4. To move telescope in the R.A. and Dec. axes again, remember to loosen the R.A.
lock and tighten the Dec. lock. Then rotate the manual slow motion control knobs
(
10, Fig. 1a) and (16, Fig. 1a) .
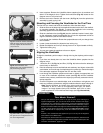
5. Practice digitally focusing on objects.
See FOCUSING THE TELESCOPE, page 19.
6. Once you get a feel for how your telescope moves and focuses, try to view some-
Note:
Viewing conditions vary wide-
ly from night-to-night and site-
to-site.Turbulence in the air,
even on an apparently clear
night, can distor
t images.
Low-power e
yepieces, such
as the UltraWide 24mm sup-
plied with your telescope, are
better suited to resolving
images in poor viewing condi-
tions.