


23
4.
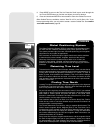
Autostar II initializes the Smart Drive if "On" has been previously chosen from
both the R.A. and Dec. PEC menus in the "Setup: Telescope" menu (the very first
time the system is tur
ned on, the Smart Drive feature will not be enabled). Once
"On" is chosen, Autostar remembers the setting until "Off" is chosen again. If "On"
has been selected, the R.A.
and Dec. motors operate briefly and "Initializing:
Smart Drive" displays.
5.
A message displays that warns not to look at the Sun. At the end of this message,
press the key prompted by Autostar II to signify that the message has been read
and understood.
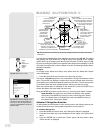
6. "Automatic Alignment" displays. Press ENTER. The system now performs the fol-
lowing routines (press any Autostar II key to abort Automatic Alignment) :
Caution: As the telescope performs the following operations, it will swing
and rotate. Keep a safe distance from the telescope.
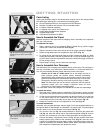
a. Finds the home position. Moves the telescope to find the "home" position.
When the home position is found, the system knows the limiting positions of
the telescope and can avoid tangling cables and over-rotating the telescope.
b. Detects “level” of the base of the telescope; finds tilt and tip. To detect
level, Autostar II must calculate "level" at three compass points. See FINDING
TRUE LEVEL
in the RCX400 INFO box on page 25.
Autostar II also determines the positioning (
i.e., tilt and tip) of the optical tube.
c. Finds North. Locates magnetic North, then calculates true North. See
FINDING TRUE NORTH, page 25.
d. Attempts a "GPS Fix." The RCX400's GPS receiver attempts to acquire and
sync up with signals from GPS satellites. "Getting GPS Fix" displays. See
THE
GLOBAL POSITIONING SYSTEM in the RCX400 INFO box on page 25.
After performing these operations, Autostar II now knows:
ܖ The telescope's limiting positions
ܖ Where level is for the telescope
ܖ The location of true North
ܖ The observing site's location
ܖ The date and time
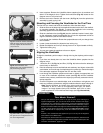
e. Star Alignment. Autostar II then chooses two stars to align upon.
"Searching...." displays. When the telescope slews (moves) to the first star for
alignment, it may not appear in the field of view in the eyepiece. If it is not, look
through the viewfinder—in most cases, the star will be visible. Use the Arrow
keys to move the telescope (you can change speed at which the telescope
moves: see
SLEW SPEEDS, page 21 for more information) until the star is vis-
ible and centered in the eyepiece. The alignment star should be easily recog-
nized and be the brightest star in the area of the sky where the telescope is
pointing. Press ENTER. Repeat this procedure for the second star. For more
information about alignment stars, see
WHICH ONE'S THE ALIGNMENT STAR?
belo
w
.
Which One’s the Alignment Star?
If A
utostar has chosen an alignment star with which y
ou are unf
amiliar
, ho
w can
you be sure if the star in your eyepiece is really the alignment star?
The rule of thumb is that an alignment star is usually the brightest star in that
area of the sky
.
If y
ou perf
orm a GO TO to an alignment star and you're not sure
if you have located the alignment star or it isn't in the eyepiece, look through your
viewfinder. When you view an alignment star in the viewfinder, it stands out dra-
matically from the rest of the stars in that portion of the sky. The viewfinder will
help you locate a star more quickly than the eyepiece, because it has a much
wider field of view than the eyepiece. Using Autostar, set the slew speed to 6 or
higher and use the Arro
w k
e
ys to center the alignment star in the vie
wfinder. If
your viewfinder has been aligned with the telescope, the alignment star should
now be in the eyepiece. Set the slew speed to 4 or less and center the star in the
eyepiece.
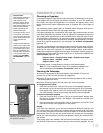
RCX400 TIPS
Important Note:
Once the telescope is
aligned, only use the Arrow
keys to move the tele-
scope. Once the telescope
has been aligned, do not
loosen the telescope locks
(
13 and 17, Fig. 1a), or
move the base manually,
or alignment will be lost.
Important Note:
If the objects you have
chosen are not in the
eyepiece after after
alignment, it is also
recommended that you
CALIBRA
TE SENSORS
.
This menu allows you to
improve your telescope's
pointing accuracy to align-
ment stars. It calibrates to
correct slight mechanical
misalignment due to
transport, vibration, or
aging. It is recommended
that calibration be
performed once on a new
telescope after the user
initially assembles it.
When this menu is
selected, the telescope
slews to P
olar
is. Autostar II
then prompts you to center
P
olar
is and to press
ENTER. Autostar II uses
the position of Polaris to
fine tune the position of
North and also detects
le
v
el f
or the base of the
telescope.